Encountering Samsung SSD visibility issues on Windows can be stressful. Especially if you are trying to update your computer or add a secondary drive to it. After all, a brand-new drive should not give you a headache.However, there are many reasons for this issue to happen, from identifying hardware connectivity problems to configuring BIOS settings and updating SSD drivers.This article offers a detailed exploration of potential solutions. It also further explores the process of formatting a Samsung SSD using various methods, including the Disk Management tool, creating and formatting a hard disk partition, and utilizing the Command Prompt.
Reasons why your Samsung SSD is not showing up on Windows
Samsung SSDs are known for their reliability and improving computer performance, being the first choice for many users. However, they are not error-free, and they may not show up on Windows computers for many reasons, such as:
- Hardware Issues. The SSD may need to be properly connected to the computer's motherboard or power supply to work properly. Besides connection and power, hardware issues include physical damage and drive malfunctions.
- Outdated or Corrupted Drivers. The SSD's driver may be outdated or corrupted, causing the system to fail to detect the SSD.
- BIOS Settings. The computer's BIOS settings may not be correct to recognize the SSD. SATA controller mode may be set to the wrong mode, or the Hot Plug-in for each port may be set to Off.
- Disk Initialization or Partitioning Issues. The new SSD may only appear in This PC, Disk Manager, or BIOS if it has been initialized or partitioned. Plus, the drive letter of the SSD may be missing or conflicting with another disk.
- Firmware Issues. This issue is related to logical problems with the drive, such as compatibility issues between the drive and software or other computer components. You may be interested in how to fix the Samsung 980 Pro firmware issue as well.
How to fix Samsung SSD not showing up on Windows 10/11
Troubleshooting and optimizing the performance of an SSD in a Windows environment can be a critical task for users seeking to ensure seamless functionality and reliability. This comprehensive guide provides insights into addressing common issues related to disk recognition, formatting, and driver updates.
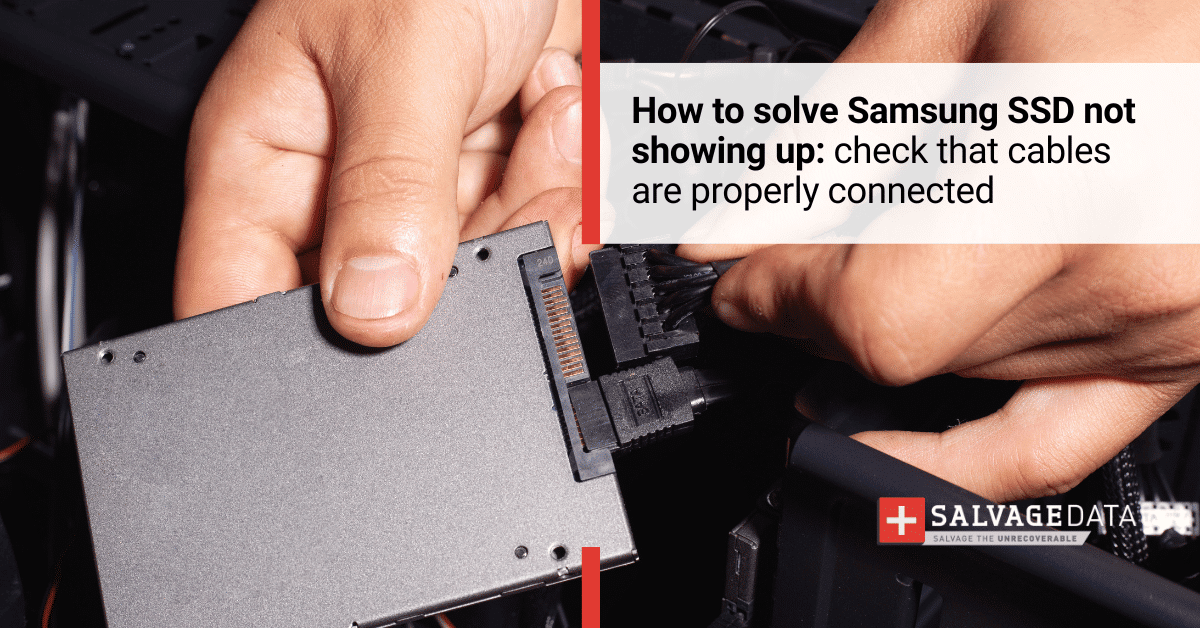
Solution 1. Check if Samsung SSD is properly connected to the computer
If your SSD is not correctly connected to the computer motherboard, it will not show up on the system. You can check it before opening your machine using Device Manager and Disk Management.
Device Manager
Right-click the Windows Start menu and select "Device Manager." Then, look for the "Disk Drives" category and expand it to display the devices connected to your computer.
Disk Management
Right-click "This PC" and choose "Manage". After that, click on "Disk Management" and look for your Samsung SSD.
Check SATA Connector
If you’re using a SATA SSD, and you did not find it on Disk or Device Management, then it's time to open the computer. Ensure that the SATA connector on the motherboard does not contain any debris or is not damaged and that it’s correctly connected.
Solution 2. Check for faulty hardware
Running the Hardware and Devices Troubleshooter can help identify and resolve hardware issues on your Windows computer. This can help in diagnosing and potentially fixing any problems related to faulty hardware.Here are the steps to run the Hardware and Devices Troubleshooter on Windows:
Access via Settings (Windows 10):
- Open Settings and navigate to Update & Security.
- Click on Troubleshoot and select Hardware and Devices.
- Follow the on-screen prompts to scan and fix any detected hardware issues.
Access via Control Panel (Windows 8/7):
- Open the Control Panel and go to Hardware and Sound.
- Select "Configure a device" to access the Hardware Troubleshooter.
Access via Command Line:
If the Hardware and Devices Troubleshooter is missing, you can run it using the command line. Simply launch the command prompt by searching for it on the search bar.
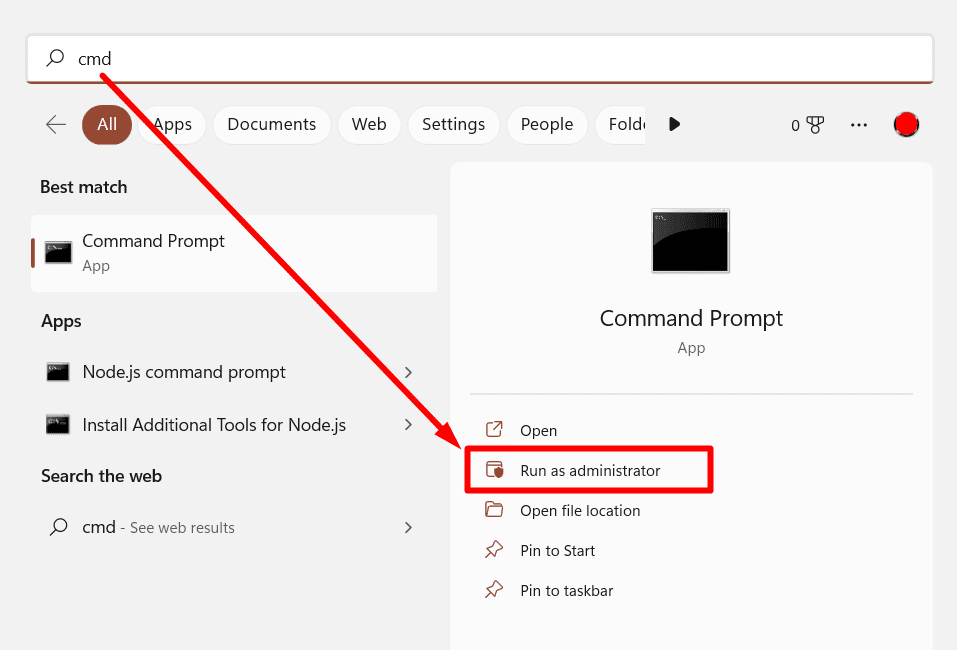
Type or paste the command "msdt.exe -id DeviceDiagnostic" to invoke the troubleshooter. It will open a new window. Click to start scanning the system. By the end, it will tell you what you must do to correct any trouble within the machine, such as outdated drivers.
Solution 3. Assign a new drive letter for your SSD
By assigning a new drive letter to your Samsung SSD, you can resolve any issues related to drive recognition.
- Right-click on "This PC," choose "Manage," and then select "Disk Management."
- In Disk Management, find the Samsung SSD, right-click it, and choose “Change Drive Letter and Paths.”
- In the dialogue box that appears, click "Change" and then select "Assign the following drive letter." Choose a new drive letter for your SSD.
- After assigning the new drive letter, open "This PC" to check if your computer can recognize the disk.
Solution 4. Create a new volume on the SSD
Similar to assigning a new drive letter, creating a new volume on your Samsung SSD can resolve issues related to drive recognition.
- Right-click on "This PC," choose "Manage," and then select "Disk Management."
- In Disk Management, find the Samsung SSD, right-click it, and select "New Simple Volume."
- In the New Simple Volume Wizard, select "Next."
- Enter the size of the volume you want to create in megabytes (MB) or accept the maximum default size, and then select "Next."
- Accept the default drive letter or choose a different drive letter to identify the partition, and then select "Next."
- In the "Format Partition" dialogue box, select the file system you want to use, such as NTFS, and then select "Next."
- Review your choices, and then select "Finish."
- After creating the new volume, open "This PC" to check if your computer can recognize the disk.
Solution 5. Initialize the Samsung SSD
When you add a new SSD to your computer, most of the time you have to initialize it. To initialize your Samsung SSD and be able to use it, follow the next steps:
- Right-click on "This PC" to choose "Manage" and then select "Disk Management"
- In Disk Management, find the SSD, right-click it, and select "Initialize Disk"
- In the Initialize Disk dialog box, choose the partition style as MBR or GPT, and then click OK.
- After initializing the disk, right-click the unallocated space on the disk and select "New Simple Volume". Follow the prompts to create a new volume on the Samsung SSD.
Solution 6. Update SSD Drivers
Keeping the drivers updated can prevent many errors and make sure your devices are always recognized. This process is crucial for ensuring the optimal performance and stability of your SSD.Pro tip: If you encounter any issues during the update process, it's advisable to seek assistance from Samsung's support.
- Start by downloading the latest version of the Samsung Magician software from Samsung's official website.
- Extract the downloaded package and run the installation wizard to install the Samsung Magician software on your computer.
- Launch the Samsung Magician software and navigate to the update tab within the application.
- Download the latest firmware updates for your Samsung SSD in the update tab. Follow the on-screen instructions to install the updates.
- After all firmware updates are completed, restart your computer to apply the changes.
Solution 7. Configure BIOS settings
BIOS is responsible for detecting and initializing hardware components, including storage devices such as SSDs. If the BIOS settings are incorrect or outdated, it can lead to SSD detection issues, and your device may not appear in the BIOS.It's important to exercise caution when modifying BIOS settings, as incorrect changes can affect the stability and functionality of your computer.Pro tip: If you are uncertain about specific settings, it's advisable to seek guidance from a professional or the computer's manufacturer.If your BIOS does not detect your disk, there are several steps you can take to troubleshoot and resolve the issue.
Update BIOS
- Determine the current version of your BIOS by checking the manufacturer's website or using a system information tool.
- Obtain the latest version of the BIOS from the manufacturer's website.
- Create a bootable USB drive with the BIOS update files using a third-party tool.
- Restart your computer and enter the BIOS setup by pressing the appropriate key during startup.
- Enter the BIOS setup, navigate to the "Update" or "Flash" option, and select the USB drive as the source for the update files.
- Follow the on-screen instructions to update the BIOS.
- After the BIOS update is complete, restart your computer to apply the changes.
Enable Hot Plug-in
- Restart your computer and enter the BIOS setup by pressing the appropriate key during startup.
- In the BIOS setup, navigate to the SATA Configuration or Storage Configuration menu.
- Look for an option to enable hot plug-ins for SATA devices. The option may be labelled as "Hot Plug," "Hot Swap," or "AHCI Hot Plug." Enable this option to allow for hot plug-in of SATA devices.
- After making changes, ensure to save the settings before exiting the BIOS setup.
Configure SATA Controller Mode
- Restart your computer and enter the BIOS setup by pressing the appropriate key during startup.
- In the BIOS setup, locate the SATA Configuration or Storage Configuration menu.
- Within the SATA Configuration menu, choose the SATA Controller Mode setting. Common options include AHCI (Advanced Host Controller Interface), IDE (Integrated Drive Electronics), or RAID (Redundant Array of Independent Disks).
- After selecting the desired SATA Controller Mode, save the settings before exiting the BIOS setup.
Update UEFI Firmware
- Check the current UEFI firmware version using the System Information tool on Windows or by entering the BIOS/UEFI setup menu.
- Obtain the latest UEFI firmware update from the manufacturer's official website.
- Copy the UEFI firmware update files to a bootable USB drive with a FAT32 partition.
- Restart your computer and enter the BIOS/UEFI setup by pressing the appropriate key during startup.
- In the BIOS/UEFI setup, navigate to the update or flash option and select the USB drive as the source for the update files.
- Follow the on-screen instructions to update the UEFI firmware.
- After the UEFI firmware update is complete, restart your computer to apply the changes.
Solution 8. Format the Samsung SSD
Formatting the SSD fixes errors that prevent it from working properly and allows you to set the proper file system, such as NTFS or FAT32. To format an SSD, you can use various methods, including using built-in Windows tools or third-party software.WARNING: formatting will erase all data on your device, therefore, do not proceed if you don’t have a backup of your files.To format your SSD, follow these instructions:
- Right-click the Windows Start menu and select "Disk Management" to open the Disk Management interface.
- Then, locate your Samsung SSD and right-click on the partition you want to format
- After that, choose the "Format" option.
- Specify the volume label, file system, and allocation unit size as needed, and then click "OK" to start the formatting process.
If you encounter any issues with your Samsung SSD, you should seek assistance from a professional or Samsung assistance. But, if you lost your data while fixing the issue, you can contact an SSD data recovery service provider, such as SalvageData, to retrieve your lost files.