Recent Articles
How To Recover Overwritten Files

The Snowflake Data Breach: A Comprehensive Overview

Mac Not Recognizing External Hard Drive: Quick Fix Solutions

How Multi-Cloud Backup Solutions Can Prevent Data Disasters

Capibara Ransomware: What is it & How to Remove

What Should a Company Do After a Data Breach: The Ticketmaster Incident
Secles Ransomware: Removal Guide

What To Do When Your Chromebook Freezes
How to Create Hyper-V Backup

What Is The Best Data Recovery Software For PC

Heloise Montini
Heloise Montini is a content writer whose background in journalism make her an asset when researching and writing tech content. Also, her personal aspirations in creative writing and PC gaming make her articles on data storage and data recovery accessible for a wide audience.

Laura Pompeu
With 10 years of experience in journalism, SEO & digital marketing, Laura Pompeu uses her skills and experience to manage (and sometimes write) content focused on technology and business strategies.
Bogdan Glushko
CEO at SalvageData Recovery, Bogdan Glushko has over 18 years of experience in high-security data recovery. Over the years, he's been able to help restore data after logical errors, physical failures, or even ransomware attacks, for individuals, businesses, and government agencies alike.
I think there's an issue with my storage device, but I'm not sure Start a free evaluation →
I need help getting my data back right now Call now (800) 972-3282
Partitioning a hard drive might seem like a technical task, but it offers several benefits that can significantly improve your computer’s performance and data security.
When you partition a hard drive, you’re splitting the drive up into specific segmented parts. This creates more parts within it to organize the data and increase your data security. Most hard drives, including external hard drives, come with a single partition that you can split into smaller partitions.
Before we go over the step-by-step on how to partition a hard drive, there are two important things to know:
First, what is a partition on a hard drive?
A partition on a hard drive is a logical division of the physical hard drive into separate, isolated sections. Each partition appears as a distinct storage unit to the computer’s operating system, and it can be used to store data, files, and software independently of other partitions on the same hard drive.
Second, what is partitioning a hard drive?
Partitioning a hard drive is the process of dividing a single physical hard drive into multiple separate, logically isolated sections or partitions. Partitioning a hard drive can help improve the performance of your computer, organize your data, and keep your important data separate from less important data. It can also aid in data recovery if your hard drive is damaged, as the other partitions on the hard drive will still be accessible.
How to partition hard drive on Windows
There are a few different ways to create partitions on hard drives, depending on what type of operating system you have.
After you have created the partitions on your hard drive, you can format them so that they can be used by your computer. To format a partition, right-click on the partition and select Format Partition. Choose the file system that you want to use for the partition and click OK to format it.
Warning: To finish the process you’ll have to format the disk. Make a backup of your hard drive data before partitioning it to avoid data loss.

If you’re using the Windows operating system, you can use the Disk Management tool, Disk Utility, or Diskpart to create partitions on a hard drive.
Create a partition on a hard drive with Disk Management
Step 1. Connect the hard drive to your computer and open the Disk Management tool. You can do this by pressing the Windows key + R.
Step 2. Type diskmgmt.msc into the Run dialog box, and press Enter.
Locate the hard drive in the list of disks.
Step 3. Right-click on the disk and select “Initialize Disk” from the menu.
Step 4. Right-click on the unallocated space on the hard drive and select “New Simple Volume” from the menu.
Add the storage size, it’s shown as megabytes, you want the partition to be.
Step 5. Choose a new drive letter and a format.

Partitioning the hard drive on Windows with Disk Utility
You can also use Disk Utility to create partitions on your hard drive.
Step 1. Connect the hard drive to your computer and launch Disk Utility.
Select the hard drive from the list of drives.
Step 2. Click the Partition button and then click Add Partition.
Enter the partition size, name, and file system.
Step 3. Click “Apply” to create the partition.
Partition hard drive on Windows with DiskPart
DiskPart is an advanced Windows tool. To partition your hard drive with it you must be comfortable using this tool.
Step 1. Connect the HD to the computer and type cmd in the Windows Search box
Right-click Command Prompt to select Run as Administrator.
Step 2. Type diskpart in and hit Enter.
Type and hit Enter after each command:
list disk
select disk 0
create partition primary size=***
assign letter=H
format fs=ntfs quick
Note: Replace 0 with the disk number of your hard drive.
Note 2: The size must be in MB
Note 3: Replace H with a new letter for your hard drive.
Then, you can type exit to close DiskPart.

How to partition hard drive on Mac
If you’re using macOS, you can use the Disk Utility tool to create partitions on a hard drive.
Step 1. Connect the hard drive to your Mac and open the Disk Utility tool.
Go to Finder and select Applications > Utilities > Disk Utility.
Step 2. Select the hard drive from the list of disks and click on the Partition button.

Enter a name for the partition in the Name field.
Step 3. Choose a format for the partition in the Format drop-down menu.
The most common option is ExFAT.
Step 4. Enter the size of the partition in the Size field. You can also drag the slider to adjust the size of the partition.
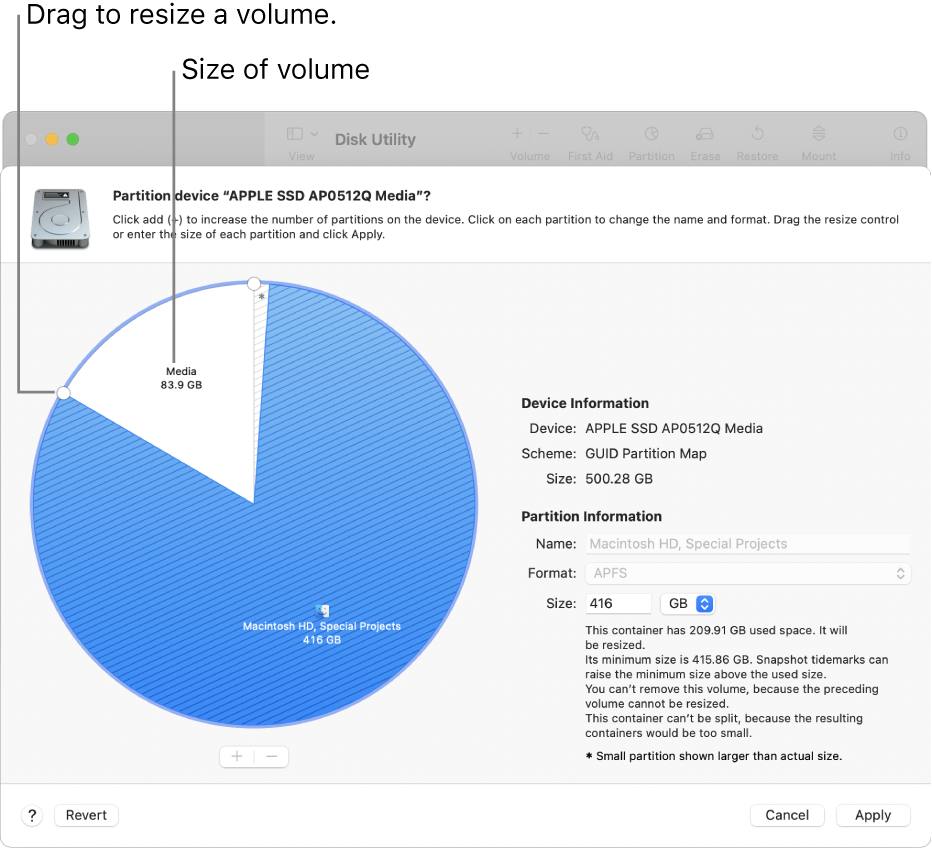
Source: Apple support
Click the Add button (+) below the pie chart.
Step 5. Click on the Apply button to create partitions on a hard drive using the Disk Utility tool.

Why partition a hard drive
Partitioning enables you to tailor your hard drive’s usage to your specific needs. For instance, it allows you to store certain types of files on separate partitions, which can help improve the performance of your hard drive.
For example, you can store frequently accessed files on one partition and infrequently accessed files on another partition. If one partition becomes damaged, the other partitions on the hard drive will still be accessible, which can be helpful if you need to recover data from a damaged hard drive.
Boosts performance
Partitioning can improve the performance of your computer. For instance, you can place frequently used files on a separate partition to reduce data fragmentation, which can speed up access times.
Facilitates organization
By creating partitions, you can better organize your data. For example, you might have one partition for your operating system and software, another for personal files, and yet another for backups or multimedia content. This separation helps keep things tidy and makes it easier to manage your data.
Helps with data recovery
If you encounter issues with one partition (e.g., data corruption or a system crash), the other partitions are often unaffected. This isolation can improve your chances of recovering data from a damaged drive.
Improves security
You can enhance data security by keeping sensitive files on a separate partition. This makes it easier to apply encryption or restrict access to specific partitions.
Best practices to follow when partitioning a hard drive
By following the best practices when partitioning your hard drive, you can ensure that its partitions are set up correctly and optimized for your specific needs.
Backup your data
Before partitioning your hard drive, it’s important to back up all your data to avoid data loss. This is because the partitioning process involves formatting the hard drive, which will erase all data on it.
Plan your partitions
Plan how you want to divide your hard drive into partitions based on your specific needs. For example, you might want to create separate partitions for your operating system, applications, personal files, and backups.
Choose the right file system
When formatting your hard drive partitions, choose the file system that best suits your needs. For example, NTFS is the default file system for Windows, while macOS uses the HFS+ or APFS file system.
Label your partitions
Give each partition a meaningful label that reflects its purpose. This will make it easier to identify and manage your partitions later on.
Leave some unallocated space
Leave some unallocated space on your hard drive for future use. This will give you the flexibility to create new partitions or expand existing ones as your needs change.
Summary
Partitioning hard drives improves performance and aids in recovery if your hard drive gets damaged. This action can also help you organize your files and applications, and keep your important data separate from less important data.
When creating a new partition to your hard drive you must first backup your data. If something goes wrong and you lose your files, contact SalvageData immediately for a secure and guaranteed hard drive data recovery.