
When your computer displays the "Reboot and Select Proper Boot Device" error at startup, the system BIOS or UEFI can't find a bootable operating system on your designated storage drive. This error occurs either because the system is searching the wrong drive, physical connections have loosened, or essential boot configuration files have become corrupted.
Important: As always, we prioritize the security of your data. A "Reboot and Select Proper Boot Device" error can also signal a failing hard drive, which puts your files at risk. Instead of repeated repair attempts, you can request a free evaluation for hard drive data recovery if your HDD is failing. Other causes, such as boot settings, loose cables, and damaged boot files, are safer to fix yourself.
What is happening when the “reboot and select proper boot device error” appears?
At startup, the motherboard's BIOS or UEFI firmware looks on the primary drive for boot files: the Master Boot Record (MBR) on older disks or the EFI System Partition (ESP) on newer ones. The error appears when the computer's BIOS or UEFI firmware cannot find a bootable operating system on the selected drive. Startup stops with the message "Reboot and Select proper Boot device or Insert Boot Media in selected Boot device and press a key."
Here are the common causes for the error and their symptoms to assist with diagnosis:
| Root cause type | Technical cause | What it looks like |
| Physical connections | Unseated SATA or NVMe drive, damaged cabling, bad power connection | Drive drops out of BIOS now and then |
| BIOS/UEFI settings | Dead CMOS battery, altered boot priority, mismatched boot mode (UEFI vs. Legacy). | The system loses time/date, or the error appears right after a power loss or after unplugging the PC. |
| Logical corruption | Corrupted MBR, damaged EFI partition, broken BCD store | Drive shows full capacity in BIOS, but Windows will not start |
| Drive failure | Head crash, mechanical wear, bad sectors, SSD controller failure | Clicking, freezing at startup, or a wrong capacity in BIOS |
The difference between logical and physical data loss explains how the table's two kinds of failure differ, and the causes of hard drive failure cover what wears a drive out. One quick check shows which row applies.
Can a dead CMOS battery cause reboot and select proper boot device?
Yes, a dead CMOS battery can cause this error. The CMOS battery maintains the motherboard memory that stores your BIOS configuration. When it dies, the BIOS resets to factory defaults every time the PC loses power. This can trigger the error in several ways:
Boot mode reversion (CSM / UEFI)
Without power from the CMOS battery, the BIOS wipes saved settings, reverting the Compatibility Support Module (CSM) to its default. This flips your boot mode between UEFI and Legacy; if that default doesn't match your drive's partition style (GPT vs. MBR), the system can't boot.
Lost drive priority
If you have multiple drives connected, the motherboard defaults to a factory drive order and may attempt to boot from an empty secondary storage drive.
Storage controller reset
A CMOS power loss restores the motherboard's default SATA/NVMe settings, often switching your drive controller mode from AHCI back to RAID or IDE. This mismatch prevents Windows from loading the necessary storage drivers to communicate with the boot drive.
Step 1: Check if your drive is detected in BIOS/UEFI
Before running software repair commands or opening your computer case, verify whether the system hardware detects your storage drive.
Warning: If your drive is making unusual mechanical noises (clicking, grinding, or scraping) or causes the BIOS menu to freeze during startup, power off the system immediately. Do not keep the drive running to run diagnostics, as operating a physically damaged drive causes permanent platter damage that requires professional recovery in a certified cleanroom environment.
To enter BIOS or UEFI:
1. Restart your computer and repeatedly press the setup key (typically F2, Del, F10, or F12) to enter the BIOS/UEFI menu.
2. Navigate to the Main or Information tab.
3. Check the list of connected storage devices to see if your SSD or HDD is listed.
Michael Galloway, HDD Recovery Engineer at SalvageData, explains how to read the result:
"First, check if the storage device is being displayed in the BIOS. If the storage device shows up in the BIOS, it could be a logical issue. A bad-sector drive will show up in the BIOS but may still prevent the OS from booting. If a storage device doesn't show up in the BIOS, it could be a failed drive or a motherboard issue.”
The result tells you what next step is:
| What BIOS shows | What it usually means |
| Correct name and full capacity | Likely a logical problem, though bad sectors can also show here |
| Drive missing | Loose cable, failed drive, or motherboard issue |
| Wrong name or 0 MB | Hardware or firmware failure |
Check the guide on hard drive health to understand how a drive can show up correctly but still not boot.
Step 2: Fix hardware connections and BIOS configurations
If your drive is physically healthy, incorrect boot orders or loose hardware connections often prevent the system from loading Windows. Fixing these basic physical and firmware settings resolves most non-corrupt boot errors.
Remove external devices and reseat cables
When recommended: Your drive randomly drops out of BIOS, or your PC tries to boot from a forgotten USB flash drive/external disk.
Loose internal cables or connected external drives can interfere with system startup. USB flash drives, external hard drives, or memory cards left plugged into the system can cause the BIOS to try to boot from a non-bootable storage medium.
To clear potential hardware conflicts:
1. Disconnect all external USB drives, memory cards, and secondary peripherals.
2. Power down the computer, unplug the power supply, and open the case or access panel.
3. Carefully disconnect and firmly reconnect the SATA data and power cables for your drive, or reseat the M.2 SSD in its slot.
4. Restart the system to check if Windows loads normally.
Replace the CMOS battery
When recommended: Your PC continuously loses its system time/date or resets its custom BIOS configuration back to factory defaults every time the power cord is disconnected. A depleted CMOS battery deprives the motherboard's volatile memory of power when the computer is unplugged, forcing the system back to default settings on every startup. To replace the battery:
1. Power down the computer, unplug the power supply, and open the case or access panel.
2. Locate the coin-cell battery (typically a CR2032) on the motherboard.
3. Press the small metal release clip on the side of the socket to eject the old battery.
4. Insert the new battery into the socket with the positive (+) side facing up until it clicks into place.
5. Close the case, reconnect the power supply, and turn on the system.
Set the boot order and boot mode (Windows 10 and 11)
When recommended: Use this when the error appears immediately after a BIOS update, a CMOS battery replacement, or a sudden power outage.
Boot Mode refers to how your system communicates with that drive: modern systems (Windows 10 and 11) use a format called UEFI (paired with a GPT drive), while older systems (Windows 7 or earlier) use Legacy mode (also called CSM, paired with an MBR drive).
If your Boot Mode and drive format don't match, your computer gets confused and shows errors like "Reboot and select proper boot device," "Boot device not found," or "No bootable device."
Fixing this simply requires matching these two settings in your system setup.
1. Open the BIOS or UEFI setup menu.
2. Use the arrow keys to move across the top menu tabs and select Boot, Boot Priority, or Startup.
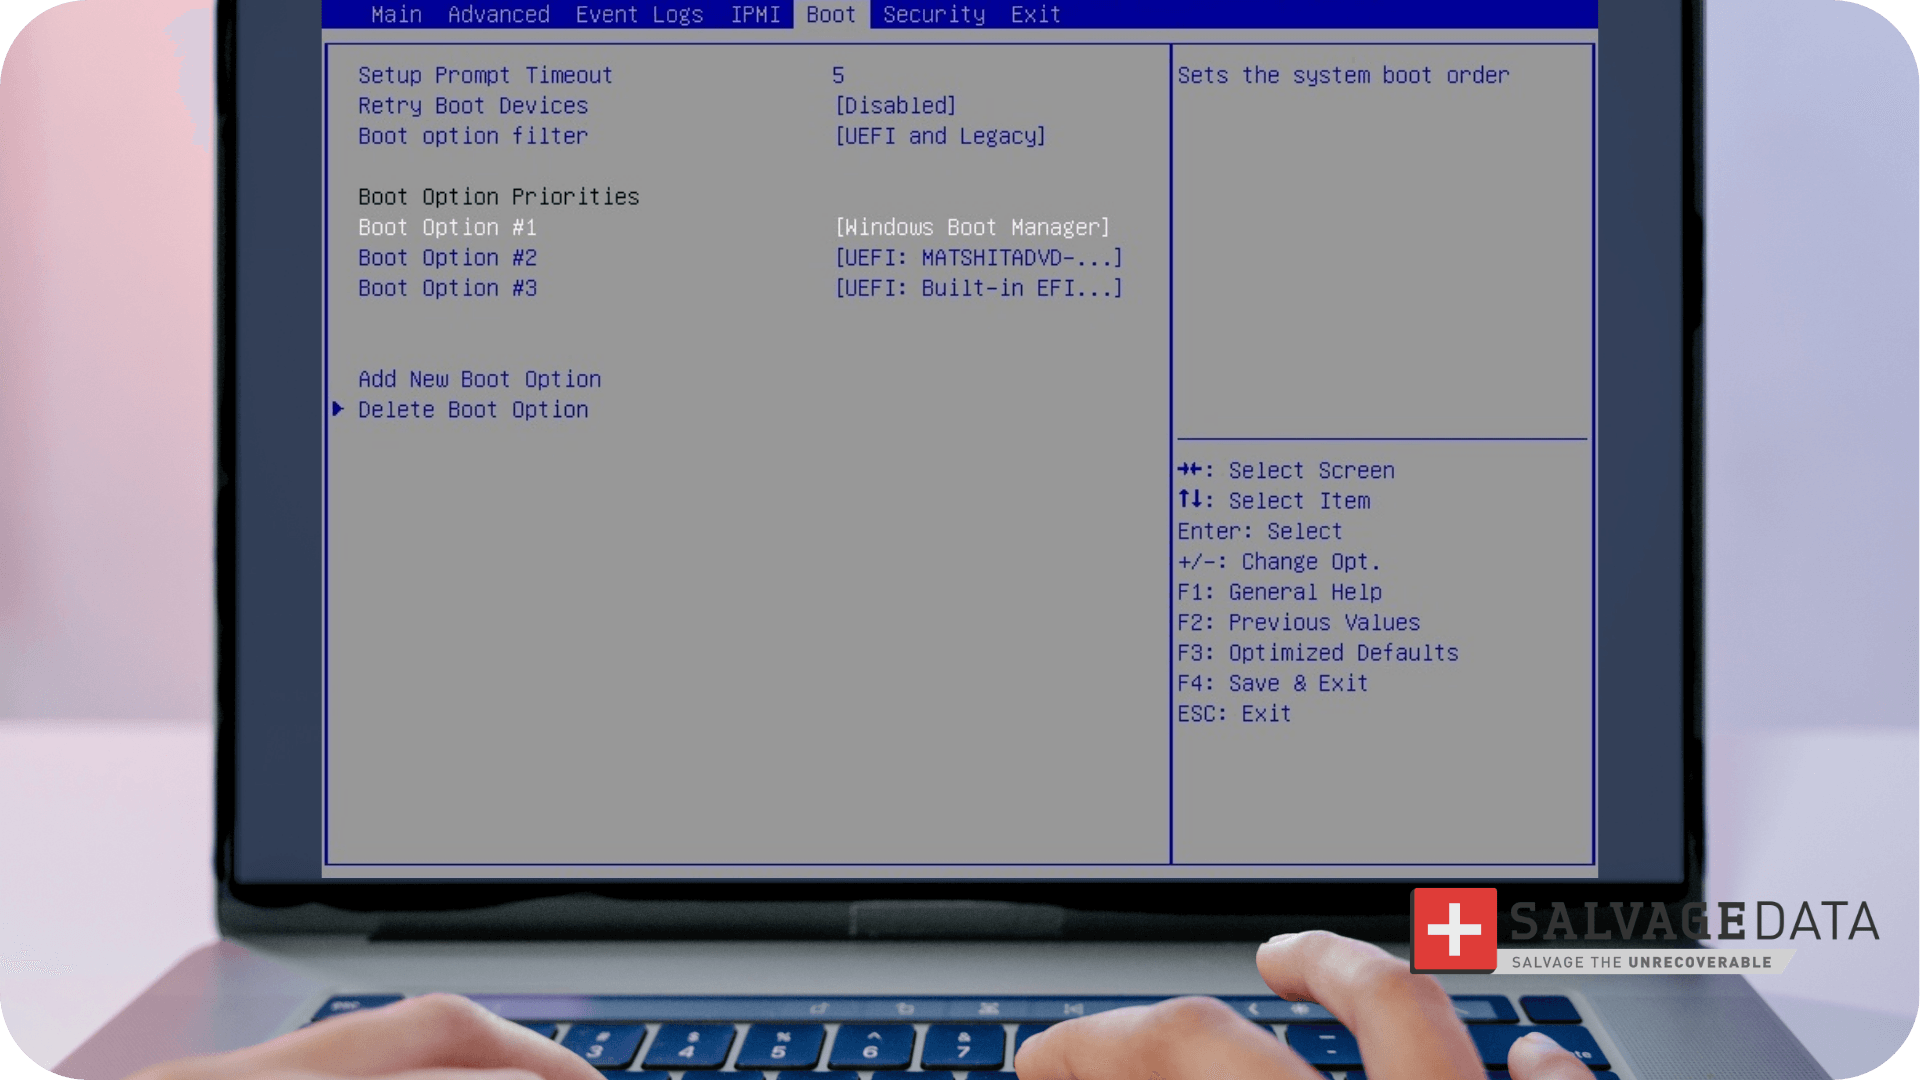
3. Locate Boot Option #1 (or First Boot Device) in the list. Change this selection to your internal drive (the SSD or HDD where Windows is installed), so your PC reads it first.
4. Look for a setting called Boot Mode, UEFI/BIOS Boot, or CSM Support:
- Choose UEFI if you are using Windows 10 or 11.
- Choose Legacy (or CSM Enabled) if you are using Windows 7 or older.
5. Press F10 on your keyboard (or navigate to the Exit tab and choose Save Changes and Reset), then confirm with Yes.
Your computer will now restart and load Windows properly.
Step 3: Fix a corrupted boot manager
If your drive is detected and BIOS settings are correct, but the error persists, your boot record files are likely corrupted. Windows relies on specific system files to initialize the kernel, and rebuilding them restores normal boot behavior without affecting your personal data.
Run Startup Repair
When recommended: Use this automated, non-destructive first step only when your drive is recognized in BIOS with full capacity and shows no signs of physical hardware failure.
Startup Repair is the Windows recovery tool that scans for damaged startup files and repairs them automatically.
To run Startup Repair:
1. Insert a Windows installation USB drive and boot from it.
2. Select your language preferences and click Next.
3. Click Repair your computer in the bottom-left corner.
4. Select Troubleshoot > Advanced options > Startup Repair.
5. Select your target operating system and allow Windows to complete the repair process.
Run Startup Repair once and do not repeat it. Repeated repair attempts and repeated hard reboots can turn a recoverable boot error into data loss.
Rebuild boot files on an MBR disk
When recommended: Recommended strictly for physically healthy drives running Legacy/CSM boot mode and an MBR partition scheme.
On older legacy systems configured with Master Boot Record (MBR) partitioning, you must repair corrupted boot sectors manually using command prompt tools from the recovery environment.
To rebuild MBR boot files:
1. Boot from your Windows installation media and navigate to Troubleshoot > Advanced options > Command Prompt.
2. Type bootrec /fixmbr and press Enter.
3. Type bootrec /fixboot and press Enter.
4. Type bootrec /rebuildbcd and press Enter to scan for Windows installations and add them to the boot configuration data.
5. Close the Command Prompt and restart your computer.
If the error remains, mark the Windows partition as active. The active flag applies to MBR disks only, not to UEFI/GPT disks. In the same Command Prompt, run these commands, replacing 0 and 1 with the numbers of the system disk and its main partition:
diskpart
list disk
select disk 0
list partition
select partition 1
active
Warning: Do not run command-line disk repairs (bootrec, diskpart) if you suspect bad sectors, mechanical wear, or physical drive failure. Writing new boot records to a physically degraded drive can overwrite user data or cause complete head failure.
Rebuild boot files on a UEFI/GPT disk
When recommended: Recommended strictly for physically healthy drives running Windows 10 or 11 in native UEFI mode with a GPT partition scheme.
Modern computers using UEFI firmware store boot files in a dedicated EFI System Partition. If these configuration files become corrupted, you must assign a drive letter to the hidden partition and generate a new set of boot files using the bcdboot command.
To rebuild UEFI boot files:
1. Open Command Prompt in the recovery environment, then run diskpart and list volume.
2. Find the FAT32 volume and assign it a letter: select volume <volume_number>, then assign letter=V:, then exit.
3. Rebuild the UEFI boot files: bcdboot C:\Windows /s V: /f UEFI
4. Remove the temporary letter with remove letter=V: in diskpart, then restart.
Assigning partition letters and rebuilding BCD files requires active read/write operations. If the SSD or HDD has corrupted controller firmware, degraded flash NAND, or bad sectors, executing these commands can permanently lock the controller or corrupt data.
When should you stop and get your data out first?
Warning: Continuous software repair attempts, repeated restarts, or aggressive command-line operations on a physically degraded or failing storage drive can cause irreversible data loss or permanent platter damage.
Attempting DIY software fixes is safe only when your storage hardware is physically sound. If your drive exhibits physical defects, software tools like bootrec or Windows Startup Repair will fail and can cause permanent sector degradation. You must stop troubleshooting immediately if you experience physical failure symptoms.
According to Kyle Ciresi, HDD Recovery Engineer at SalvageData, the most damaging mistakes after a failure are keeping the drive connected and trying to read data from it, trying to "recover" a damaged drive without help, and saving recovered files onto the same drive, which overwrites data. The guide on preventing overwriting covers that last risk.
Physical Failure Symptoms vs. Immediate Actions
| Drive Symptom / Error | Root Cause | Immediate Action Required |
| Clicking, grinding, or scraping sounds | Mechanical head crash or spindle motor failure | Power off the system immediately. Do not attempt software repair commands. |
| Drive shows 0 MB or RAW status in BIOS | Controller failure or degraded flash memory | Discontinue boot attempts to prevent permanent NAND wear or controller lockout. |
| Severe system freezing during BIOS detection | High concentration of unreadable bad sectors | Stop diagnostic scans. Sector-level cloning in a lab is required. |
| Drive completely absent from BIOS | Circuit board (PCB) or power delivery failure | Seek professional hardware diagnostics to prevent electronic damage. |
What to do if the drive is not safe to repair
When DIY procedures fail, or your storage hardware shows physical warning signs, forcing the drive to operate puts your critical files at risk. Standard software utilities cannot bypass hardware degradation, mechanical head issues, or corrupted controller microcode.
If your drive shows signs of physical damage, shut down your system and consult specialists offering professional data recovery services. For high-density solid-state drives, expert solid-state drive recovery allows engineers to access flash memory directly in an ISO Class 5 cleanroom environment, safely bypassing damaged controllers. If you are unsure whether your drive has suffered physical failure, you can request a free evaluation to safely determine your options before risking permanent data loss.