
CRITICAL WARNING: A "Fatal Device Hardware Error" indicates physical component failure, such as failing read/write heads, bad sectors, or controller degradation.
Do NOT run CHKDSK, format, or use automated disk repair utilities on a physically failing drive. Repeated read attempts can stress mechanically failing components, worsen damage, and reduce the chances of a successful data recovery.
The Windows issue "The Request Failed Due to a Fatal Device Hardware Error" is most often caused by the operating system being unable to access the HDD/SSD or read or write files to it. This error message means the Windows OS cannot communicate with the drive because of some physical damage or corruption.
A cable problem or physical damage with the hard drive/SSD can also induce this deadly device hardware fault. When this happens, you see the “ Request Failed Due to a Fatal Device Hardware Error” message as you try to copy content from your external hard drive or USB flash drive. This error can also take place during or after you've installed a new program, driver, or firmware update.
Major causes for the Fatal Device Hardware Error
- The hard drive cable is faulty
- There are bad sectors on the disk.
- Damaged Windows Request Control Block (RCB)
- Hardware fault in the hard drive.
- Outdated, missing, or corrupt drivers.
- There’s physical damage to the external drive
How to fix The Request Failed Due to a Fatal Device Hardware Error?
There are several solutions you can follow to fix the Fatal Device Hardware Error.
Solution 1. Check the cables
As we mentioned before, loose cables can be the reason behind this error. Make sure that all the cables connecting your HDD/SSD are free of damage and the transfer port works properly. You can connect the storage device to a different port or computer and see if the error message is still appearing.
You can also replace the USB cable with a new one. But, if you are still seeing The Request Failed Due to a Fatal Device Hardware Error message, then go for the following solutions to continue trying to fix the problem.
Solution 2. Run CHKDSK for logical errors only
CHKDSK is a Windows file system consistency tool. It is designed to repair directory index errors and logical corruption caused by improper shutdowns or software crashes, not to repair physical drive components.
Do not run CHKDSK on a drive producing physical errors, unusual sounds (clicking, grinding, buzzing), or SMART warnings. The /r parameter forces a full sector-by-sector scan of the entire drive. On a drive with degraded read/write heads, this can trigger a head crash, stripping the magnetic film from the platters and permanently destroying the data.
CHKDSK is appropriate only when all three conditions are true:
- The drive is detected by the system and shows its correct capacity in Disk Management.
- The error occurred after an improper shutdown, power outage, or accidental disconnect.
- The drive produces no unusual sounds, no SMART alerts, and no repeated dropouts.
If those conditions are met, follow these steps:
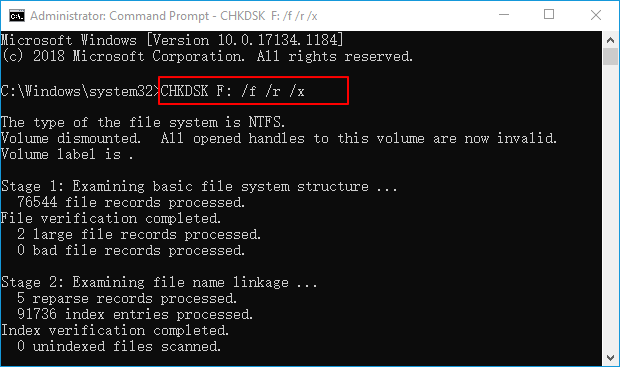
Step 1: Press Windows + S and search for Command Prompt. Right-click and select Run as administrator.
Step 2: Type the following command and press Enter. Replace X with the letter of the drive showing the error:
chkdsk X: /f
Do NOT add /r or /x. The /r flag performs a full surface scan that can accelerate damage on a failing drive. Only use /r if a technician has confirmed the drive is physically healthy.
Step 3: Let the scan complete and restart the computer.
If CHKDSK reports unreadable sectors, stops partway, or the system freezes during the scan, power off the drive immediately and proceed to professional evaluation.
Warning: Only attempt the steps 3 and 4 if your drive contains no data you need to recover, or if you have already confirmed the error is not caused by a physical hardware failure. If your drive produces unusual sounds, drops off the system, or shows 0 Bytes in Disk Management, do not initialize or format. Power down and contact a data recovery professional.
Solution 3. Initialize the disk
If your disk is not initialized, you can end up with the error as well. Check the drive status and whether the hardware is initialized.
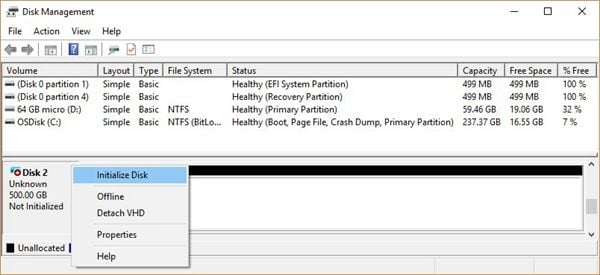
Step1. Right-click on This PC and select Manage.
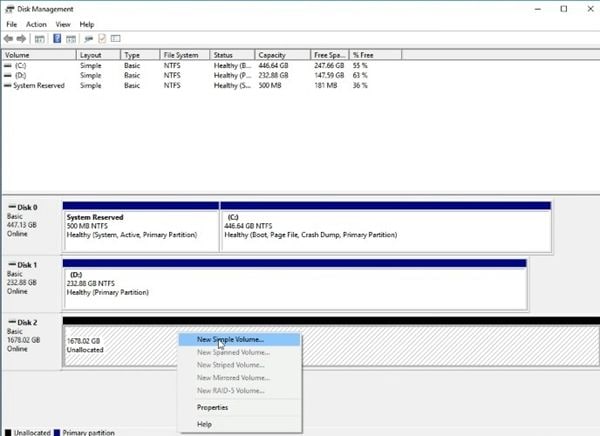
Step 2. From the left tab, click on Disk Management. There, right-click on your hard drive and click "Initialize Disk".
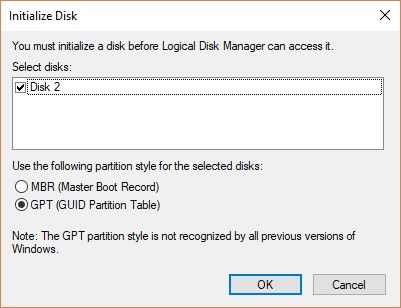
Step 3. Select either MBR or GPT partition style to initialize the drive. This will make your disk show as Unallocated, and you’ll need to assign a volume to it.
Step 4: Right-click on the disk and click New Simple Volume. Specify volume size and assign a drive letter.
Solution 4. Format the drive
If the Request Failed Due to a Fatal Device Hardware Error still appears, then you might have to format your drive. That’s because formatting the disk can delete logical errors.
Important: This will delete all the data on your drive, so be sure to back it up first.
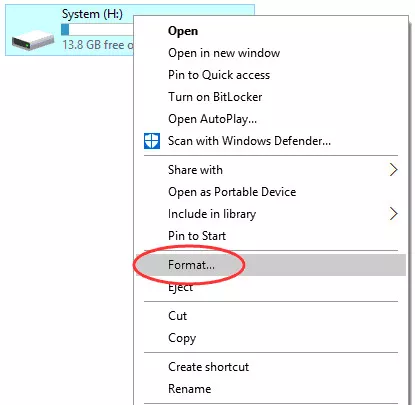
Step 1. Go to This PC/My Computer and select the disk with the error.
Right-click on it to choose Format.
Step 2. Uncheck the Quick Format option and click Start.
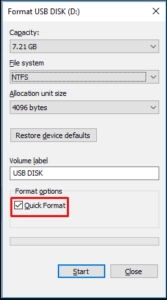
Wait for the process to end and initialize the disk.
Solution 5. Contact a recovery service
If any of the above solutions worked, you may appeal to a data recovery service. Contact SalvageData for a free in-lab evaluation of your external storage device.
Our experts will scan your HDD, SSD, or other USB drive and restore your files. Contact us at any moment.
TL; DR: You can try to fix The Request Failed Due to a Fatal Device Hardware Error on your own, using Windows built-in tools. But, always start by checking cables and ports. This error has many causes, and sometimes your solution is simpler than you expect.
How to safely extract data from a physically failing drive
Standard copy-paste through File Explorer will often freeze or crash when the drive encounters a bad sector. Each failed read attempt puts more stress on the hardware. The correct first step is to create a byte-for-byte sector image of the drive, then work from the image file.
This process requires a tool that handles hardware read timeouts gracefully and a hardware write-blocker to prevent accidental writes to the source drive.
Safe imaging steps:
Step 1: Connect the failing drive through a hardware write-blocker to a separate, healthy system. Do not open the drive in File Explorer or let the OS auto-mount it.
Step 2: Use GNU ddrescue (Linux) or FTK Imager to create a raw sector-level image of the drive. Set the tool to skip unreadable sectors on the first pass rather than retrying them.
Basic ddrescue command (replace /dev/sdb with the failing drive identifier and update the destination path):
ddrescue -d -r 1 /dev/sdb /mnt/destination/disk_image.img /mnt/destination/map.log
Step 3: Once the image file is complete, run file recovery software against the image file, not against the physical drive.
Step 4: Save all recovered files to a separate, healthy storage device.
If the drive is not detected, drops off the system during imaging, or produces clicking or grinding sounds, stop the attempt. Those symptoms indicate physical component failure that requires cleanroom-level repair before imaging is possible.
When to stop DIY and contact a professional
If a drive is showing physical hardware degradation, continuing software recovery attempts can cause irreversible media damage. Power down the drive and stop all operations if any of the following symptoms are present.
STOP DIY RECOVERY IMMEDIATELY IF:
- The drive produces clicking, grinding, or high-pitched whining sounds.
- The drive disconnects from the system repeatedly within minutes of being powered on.
- Disk Management shows the drive as "Uninitialized" with 0 Bytes capacity.
- The drive is not detected at the system BIOS or UEFI level.
Disconnect both the data and power cables immediately.
Physical drive repair requires ISO Class 5 cleanroom conditions. Head assembly replacements use donor components matched to the specific drive model and firmware version. Hardware imaging consoles (such as PC-3000) are used to extract a stable image before any logical recovery work begins.
SalvageData offers a free in-lab evaluation for drives showing physical hardware failure. Contact the team 24/7 to start a case or submit a free online evaluation.