
A MacBook that won't turn on is usually caused by a power, startup, or hardware issue, and the solution depends on the root cause.
Intel-based Macs and Apple Silicon Macs (M1 through M4) use different reset methods, so first identify your chip type before trying anything else.
This guide covers diagnosis, safe first steps, Mac and MacBook data recovery options if data is at risk, and when the issue points to a logic board repair instead of a software fix.
How to diagnose a MacBook that won’t turn on
Before attempting system resets or assuming a major hardware failure, run through these quick diagnostic and safety checks.
The MacBook has no power at all
No fan noise, keyboard backlight, or startup chime occurs, and the chassis remains cold to the touch. This points directly to an issue within the power delivery system, battery, or logic board.
The MacBook shows signs of life, but the screen stays black
The fan spins, the chassis gets warm, or the Caps Lock key light toggles when pressed, but the display remains dark. The Mac is actually running; refer to the guide on fixing a MacBook screen that is black but still running.
The MacBook turns on but freezes during startup
The Mac powers on and displays an Apple logo or progress bar, but fails to reach the desktop. Read the guide on what to do if your Mac does not start up all the way for software-level recovery steps.
Power adapter or cable failure
Worn cables, bent connector pins, or underpowered third-party power adapters can prevent the machine from powering on or charging. Verify the wall outlet functions, inspect your charging setup for visible damage, and confirm the adapter supplies the required wattage for your specific MacBook model.
Connected external peripherals causing power or boot interference
External accessories can draw excessive voltage away from a depleted battery or trigger a system safety lockup. Unplug all devices, including external drives, USB-C hubs, monitors, and adapters, and attempt to power on using only the power cable.
Potential or known liquid exposure
Applying electrical current to a wet system causes immediate short circuits across internal components. Use a flashlight to inspect the keyboard, trackpad edges, headphone jack, and USB-C ports for moisture. If liquid is present, disconnect the power immediately, wipe down the body, and follow the water-damaged MacBook repair guide before proceeding.
Once these checks are complete, move on to platform-specific resets based on whether your MacBook uses an Intel processor or Apple Silicon.
How to check which MacBook model you have (Intel vs. Apple Silicon)
Knowing whether your MacBook runs on an Intel processor or Apple Silicon matters because each architecture uses different power-reset and system-recovery procedures. Even if your Mac will not turn on, you can identify your chip architecture using the physical serial number printed on the machine.
Step 1: Locate the Serial Number
1. Turn your MacBook upside down and place it on a soft surface.
2. Look at the small regulatory text printed directly on the bottom aluminum case near the hinges.
3. Locate the sequence labeled Serial, which consists of an 11- or 12-character alphanumeric code. If the text is worn off, check the original product box or receipt.
Step 2: Look Up Your Specs
1. Open a browser on a working smartphone or computer and navigate to the official Apple Check Coverage page (checkcoverage.apple.com).
2. Enter your serial number and complete the security prompt.
3. Review the exact model description and release year displayed in the results.
Quick Reference: Architecture by Model Year
Use the table below once you have your model description and release year to confirm which reset instructions apply to your Mac.
| Architecture | Release Years & Specific Models | Key Characteristics |
| Apple Silicon | Late 2020 to Present (M1, M2, M3, M4 chips) | Includes MacBook Air (Late 2020 and newer) and MacBook Pro (14-inch/16-inch models, plus 13-inch M1/M2 models). |
| Intel | 2020 and Earlier (Core i3, i5, i7, i9 processors) | Includes all MacBooks released before November 2020, as well as early 2020 Intel MacBook Air and 13-inch/16-inch Intel MacBook Pro models. |
Is there a risk of data loss when a MacBook won’t turn on
The risk of data loss depends on the troubleshooting solution you choose, but most solutions are risk-free.
Choosing a harsh troubleshooting step, like erasing the drive or forcing a full reinstall, can permanently wipe files that were otherwise completely safe and recoverable. The table below sorts each fix by risk level so you can skip straight to the safe options if data loss is a concern.
| Solution | Data risk | Reasoning |
| Power connection or peripheral check | None | No changes made to the drive or system |
| Hard reset or power cycle | None | Restarts hardware, does not touch stored data |
| SMC or NVRAM reset | None | Resets hardware settings, not user files |
| Safe Mode boot | None | Runs a disk check, does not erase files |
| DFU mode/firmware revive | Low | Restores firmware without wiping the drive, when done correctly |
| macOS Recovery: Reinstall macOS | Moderate | Can overwrite system files if the wrong option is chosen |
| macOS Recovery: Disk Utility erase | High | Deletes all data on the selected volume |
How to fix an Intel-based MacBook that won’t turn on
Intel MacBooks have two low-level resets available that Apple Silicon Macs do not: the SMC reset and the NVRAM reset. Both are safe, reversible, and worth trying in order before assuming a hardware fault.
1. Perform a hard reset on an Intel-based MacBook
Hold the power button until the MacBook is confirmed off, disconnect all peripherals, then hold the power button again for 10 seconds before releasing it and pressing it once more to start up normally.
2. Execute a power cycle
If that does not resolve the issue, try a power cycle instead. Unplug the power cable, wait 10 seconds, plug it back in, and press the power button. Avoid repeating a power cycle multiple times in a row, since it places more strain on the hardware than a standard restart.
3. Reset the System Management Controller (SMC)
The SMC manages power delivery, battery behavior, and thermal controls, and resetting it is safe and carries no data risk. The exact key combination depends on whether the Mac has the Apple T2 Security Chip.
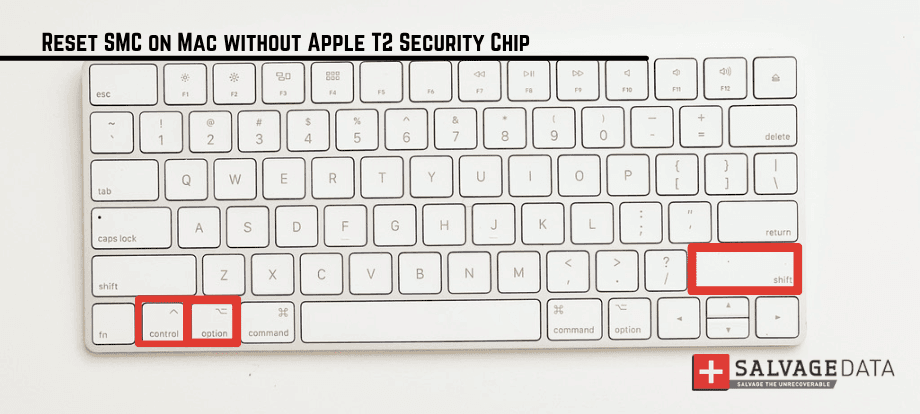
- On Intel Macs with the T2 chip (2018 to 2020 models): press and hold Control (left), Option (left), and Shift (right) for 7 seconds. Without releasing them, press the power button and hold everything for another 7 seconds, then release all keys and press the power button again to start up.
- On older Intel Macs without a T2 chip (2017 and earlier): press and hold Control, Option, and Shift, all on the left side, together with the power button for 10 seconds, then release and turn the Mac on.
4. Reset the NVRAM
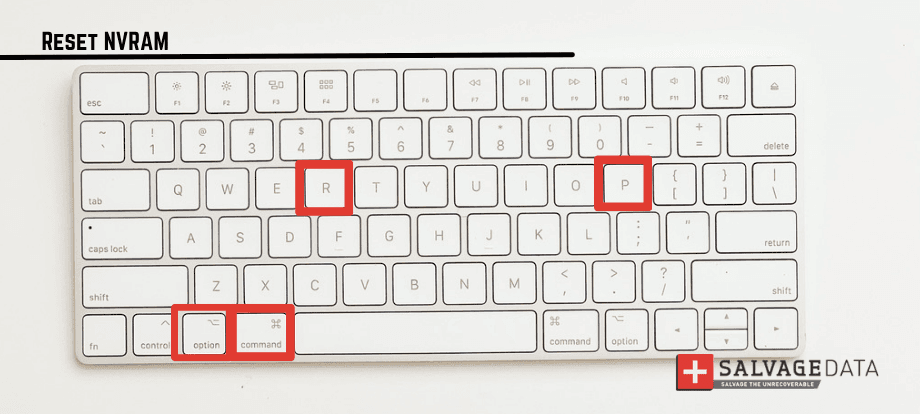
If the SMC reset does not help, reset the NVRAM next. Shut down the Mac, then press the power button and immediately hold Option, Command, P, and R. Hold the keys for about 20 seconds, or until the Apple logo appears and disappears a second time, before releasing.
This clears stored settings related to speaker volume, display resolution, and startup disk selection, and can resolve boot issues tied to corrupted preferences.
How to fix an Apple Silicon MacBook (M1 to M4) that won’t turn on
Apple Silicon MacBooks do not have a manually resettable SMC or NVRAM. The system on a chip handles power management on M1 through M4 chips automatically, so no key combination resets it.
1. Force-restart an Apple Silicon MacBook
Press and hold the power button for 10 seconds until the display goes black or the Mac powers off, then release it. Press it again briefly to restart normally.
2. Access the startup options menu
If a forced restart doesn't bring the MacBook back, check the startup options menu instead of chasing a reset that doesn't apply to this hardware.
Press and hold the power button until "Loading startup options" appears on screen. From there, you can access Recovery, Disk Utility, or a connected startup disk without risking your stored files.
How to boot your MacBook into Safe Mode and macOS Recovery (Advanced)
Warning: While Safe Mode is non-invasive, macOS Recovery tools carry moderate to high data loss risks. If you are uncomfortable navigating these recovery options, consider contacting a certified Apple Independent Repair Provider before attempting system modifications.
If basic hardware checks don't resolve the issue and your MacBook shows any signs of life, corrupted information on the startup disk may be preventing macOS from booting.
Booting into Safe Mode to fix software issues
Safe Mode is the lowest-risk way to check for startup drive issues by forcing macOS to run basic diagnostics without modifying your personal files.
- On Intel Macs: Power the Mac off, wait 10 seconds, then power it on and immediately hold the Shift key until the login window appears with "Safe Boot" in the upper corner.
- On Apple Silicon (M1–M4): Press and hold the power button until "Loading startup options" appears. Select your main startup drive, hold the Shift key, and click "Continue in Safe Mode."
If the MacBook starts normally in Safe Mode, the problem is very likely software-related. If it still does not start, Recovery Mode is the next step.
Using macOS Recovery to repair or reinstall
macOS Recovery provides access to Disk Utility, Reinstall macOS, and Time Machine backups.
- On Intel Macs: Hold Command + R immediately after pressing the power button, releasing the keys once the Apple logo or spinning globe appears.
- On Apple Silicon: Press and hold the power button down until "Loading startup options" appears, select Options, and click Continue.
If your MacBook boots normally but still displays nothing, that is a distinct issue covered separately in our guide on how to use Mac Recovery Mode.
How to revive an unresponsive Mac with DFU mode (Advanced)
Warning: Device Firmware Update (DFU) mode is an advanced troubleshooting method that carries a high risk of total data loss. Selecting "Restore" instead of "Revive" in Apple Configurator will permanently erase your internal storage.
When a MacBook shows no signs of life after a forced restart, DFU mode is an option most troubleshooting guides skip. It reinstalls the low-level firmware that controls startup without touching the user data stored on the drive. To use DFU mode, you need a second host Mac running Apple's free Apple Configurator software and a compatible USB-C data cable.
Connect the unresponsive MacBook to the host Mac, follow Apple Configurator’s prompts to place the device into DFU mode, and select Revive. This reinstalls the corrupted startup firmware layer, bringing back machines that show zero response to the power button.
According to Michael Galloway, hard drive recovery engineer at SalvageData, a MacBook with a dead T2 or M-series chip has no realistic data recovery path until the chip itself is replaced or repaired, since the encryption keys live on that chip and nowhere else. DFU revival catches firmware-level corruption before assuming permanent hardware failure.
What to do if your MacBook still doesn’t turn on
Warning: Attempting hardware repairs or forcing system reinstalls on unstable hardware can cause permanent data loss. If non-invasive resets fail, seek professional assistance from an Apple Authorized Service Provider or certified Independent Repair Provider.
When non-invasive resets and firmware revivals fail, the fault almost certainly lies within the display or the logic board itself. Galloway notes that a persistent black screen with no power response usually points to a logic board component failure or a damaged screen assembly, which you can distinguish by whether the machine shows subtle signs of life, like chassis warmth or a functional Caps Lock light.
Since modern MacBooks solder the storage drive directly to the main circuit board (the logic board) and lock it with built-in encryption, your files and the computer's physical hardware are permanently linked. If the logic board dies, you cannot just unscrew the hard drive and plug it into another computer to save your photos and documents. The only way to get your files back is to repair that specific board.
Often, an unresponsive Mac isn't entirely dead; a single faulty component (such as a damaged USB-C controller rail failing to negotiate power properly) can prevent the entire board from turning on. Micro-soldering technicians can trace these power faults and replace damaged chips using donor parts, restoring the logic board so the Mac boots up and your data remains intact.
Avoid attempting forced system erasures or macOS reinstallations on unstable hardware, as unexpected power cuts during these processes can severely corrupt the underlying file system.