An external hard drive not showing up on Mac does not always mean it has failed. In many cases, the issue is a Finder setting, an incompatible file system, or a failed USB enclosure rather than internal disk damage.
External hard drive recovery specialists at SalvageData handle hundreds of these cases each year, and the diagnostic process always starts the same way: identify where detection fails before taking action.
Why your external hard drive is not showing up on Mac
An external hard drive not showing up on a Mac is almost always caused by one of the following: incorrect Finder settings, an incompatible or corrupted file system, a failed USB enclosure, insufficient power from a hub or adapter, or physical damage to the drive. The distinction between logical and physical data loss determines which approaches are safe to try and which risk making things worse.
The causes below are ordered from most common to most serious.
Faulty cable, adapter, hub, or port
A damaged cable, an underpowered USB hub, or a faulty USB-C adapter is the most frequent reason an external drive does not appear on a Mac. Without a stable signal, macOS may fail to register the device consistently or may disconnect it during mounting.
Low-quality hubs are especially problematic for bus-powered 2.5-inch HDDs, which draw current from the USB connection rather than a separate power cable. A hub that cannot deliver a steady current causes the drive to spin up, then cut out before macOS can finish mounting it.
Finder preferences are hiding the drive
The most common software reason an external drive does not appear on the Mac desktop is that Finder is not configured to show external drives. This is a default setting issue, not a sign of damage.
The drive has power but won't mount
Some drives spin up and appear in Disk Utility but stay inaccessible in Finder. A drive with power that will not mount usually has directory corruption, journal damage, or a file system error that macOS cannot resolve automatically.
This is a non-mechanical issue and, in many cases, can be repaired using Disk Utility's First Aid tool or Terminal commands.
Incompatible or corrupted file system
macOS can read NTFS volumes natively but cannot write to them without third-party software. In some cases, damaged or improperly ejected NTFS volumes may fail to mount at all.
Beyond format incompatibility, exFAT and APFS volumes are both vulnerable to directory corruption after an improper disconnect.
| File system | Mac read | Mac write | Best use |
| APFS | Yes | Yes | Mac only. Default format for macOS Ventura and later. |
| HFS+ | Yes | Yes | Older Macs. Legacy format before APFS. |
| exFAT | Yes | Yes | Mac and Windows. Recommended for cross-platform drives. |
| NTFS | Yes | No | Windows native. Read-only on Mac without a third-party driver. |
| FAT32 | Yes | Yes | Cross-platform. A 4 GB per-file size limit makes it impractical for large media files. |
Insufficient power delivery
2.5-inch bus-powered HDDs require a consistent current from the USB port, and USB hubs that split power across multiple devices often cannot deliver enough.
The result is a drive that spins, hesitates, and disappears before macOS finishes mounting it.
SalvageData's guide on external hard drives that keep disconnecting covers the full range of power-related detection failures in more detail.
External enclosure or bridge board failure
This is among the most overlooked causes of external drive detection failures.
Portable drives from WD, Seagate, and similar brands house the disk inside a plastic shell with a USB bridge board. That bridge board converts the drive's native connection into a USB signal the Mac can read. When the bridge board fails, the drive disappears from macOS entirely. The disk itself may be undamaged.
The test is straightforward: connect the bare drive to a different USB adapter or enclosure. If the enclosure uses a standard removable SATA drive, testing it in another known-good adapter can confirm whether the enclosure failed.
Warning: Do not open sealed or proprietary external drives unless you know the hardware design, since some models use encryption or nonstandard connectors.
Physical drive failure
Clicking, grinding, or beeping sounds from an HDD usually indicate physical damage. Clicking usually means the read/write heads are attempting to read but failing, either due to head damage, platter surface damage, or a bad PCB. Every second the drive remains powered in this state increases the risk of platter damage. Power off the drive immediately and do not attempt any software fix.
Michael Galloway, HDD Recovery Engineer at SalvageData, notes that early warning signs users often miss include transfer errors, freezing while opening files, and unusually slow performance. These symptoms frequently appear before a drive stops mounting entirely.
What not showing up actually means
The layer where the drive disappears tells you exactly what kind of problem you are dealing with. Applying the wrong fix to the wrong failure wastes time and can cause additional damage.
| Where you see the drive | Most likely cause | What to do |
| Disk Utility but not Finder | Mount failure or Finder settings | Check preferences, click Mount |
| System Information only | USB bridge or enclosure failure | Test bare drive in a different adapter |
| Nowhere | Hardware failure or power issue | Rule out cable and port, then evaluate professionally |
- To check System Information:
- Go to the Apple menu and select About This Mac
- Click System Report
- Select USB in the left panel
A drive that appears in the USB device tree confirms the Mac is detecting the device at the connection level, making complete cable, port, or power failure less likely.
How to fix an external hard drive not showing up on Mac
Work through these steps in order. Earlier steps carry no data risk. Stop immediately if the drive makes noise or behaves differently after any step.
| Step | Skill level | Data risk | |
| 1 | Reconnect | Beginner | None |
| 2 | Test cable and port | Beginner | None |
| 3 | Check Finder | Beginner | None |
| 4 | Open Disk Utility | Beginner | None |
| 5 | Check System Information | Beginner | None |
| 6 | Try another computer | Beginner | None |
| 7 | Run First Aid | Beginner–Intermediate | Low |
| 8 | Use Terminal | Intermediate | Low–Moderate |
Step 1: Reconnect the drive safely
Unplug the drive and wait 30 seconds before reconnecting. This clears the USB bus cache. Reconnect directly to the Mac's built-in port, skipping any hub or dock.
Step 2: Test a different cable or port
Use a known-good cable. Try every available port on the Mac. If the drive appears on a different port, the original port may have failed.
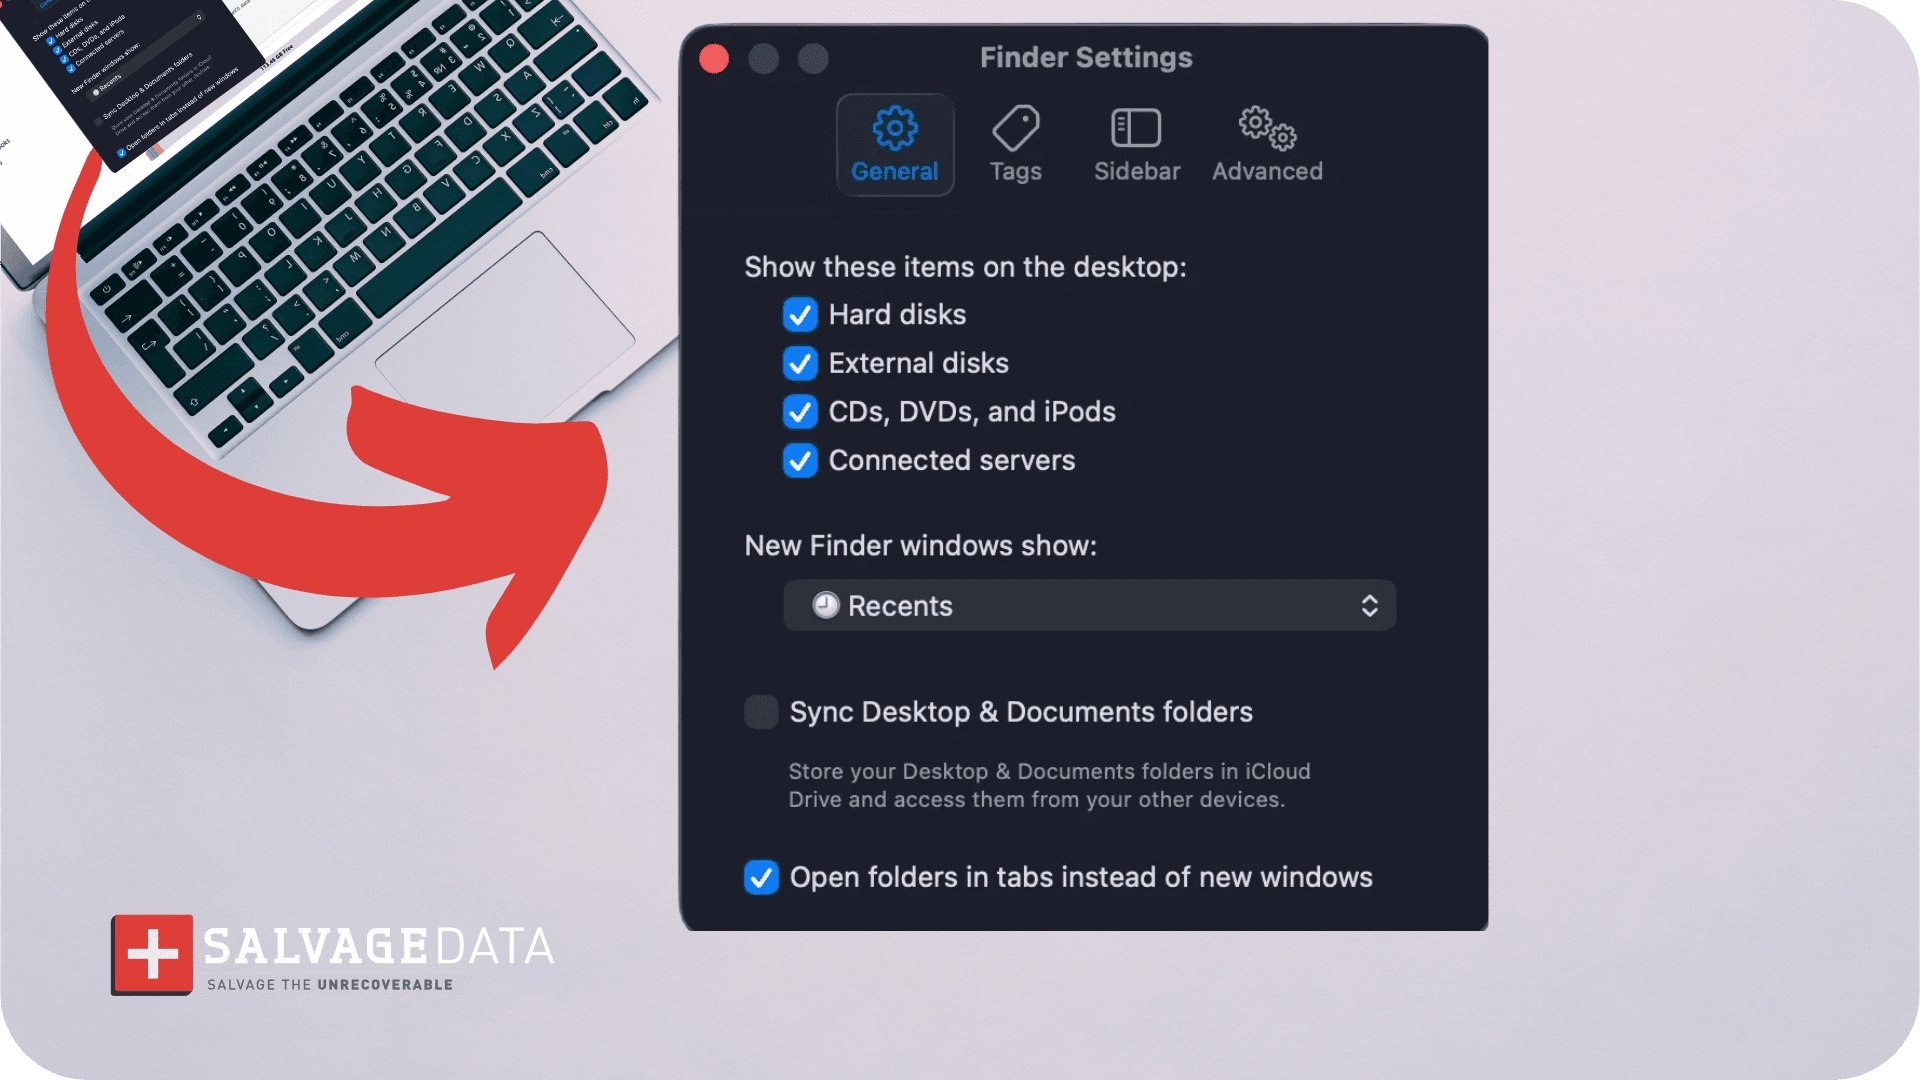
Step 3: Check Finder preferences
Open Finder, click Finder in the menu bar, select Settings (called Preferences on macOS Monterey and earlier), go to the General tab, and check External disks. Then open the Sidebar tab and check External disks under Locations. Unplug and reconnect the drive after enabling both settings.
Step 4: Open Disk Utility
Go to Applications > Utilities > Disk Utility. Click View in the top-left corner and select Show All Devices. Look for the external drive in the left panel.
If the hard drive is listed here but is absent from Finder, the problem is a mounting or formatting issue. A drive that does not appear here at all needs the System Information check in Step 6.
Step 5: Check System Information
Go to the Apple menu > About This Mac > System Report > USB. Review whether the drive appears in the USB device tree.
| Result in System Information | Meaning |
| Drive appears in USB tree | Port and cable are working. Problem is enclosure, file system, or mount |
| Drive does not appear | Cable, power, or drive hardware failure. Do not continue with software steps |
Step 6: Try another computer
Connect the drive to a second Mac or a Windows PC. If it appears immediately on another machine, the problem is with the first Mac's software, settings, or port. If the drive does not appear on any computer, a hardware failure is the most likely cause, and a professional evaluation is the next step.
Step 7: Run First Aid
Select the volume in Disk Utility and click First Aid. First Aid checks directory structure, catalog corruption, and metadata errors. It is safe for drives showing no physical symptoms.
Do not run First Aid on a drive that is making noise or that has been dropped. Forcing a full-volume scan on a mechanically compromised drive can trigger a complete failure and make professional recovery harder.
Step 8: Use Terminal
Open Terminal (Applications > Utilities > Terminal). Type diskutil list and press Return.
Find the drive by size and note its identifier, such as disk2 or disk3s1. Then type diskutil mountDisk /dev/disk2 (replacing disk2 with the correct identifier) and press Return.
Use Terminal carefully. Running a command on the wrong disk identifier can affect other connected drives. If the command returns an error rather than mounting the drive, stop here.
What if the drive shows in Disk Utility but won't mount?
A drive that appears in Disk Utility but cannot be mounted has a software-level issue: file system corruption, a damaged partition table, journal damage from an improper disconnect, or bad sectors preventing a clean read.
First Aid is the starting point. If First Aid fails or returns errors it cannot repair, the file structure may be too damaged for macOS to handle without recovery tools.
Recovery software can scan the unallocated space and locate file structures even when the partition table is damaged.
However, software has limits. A hard drive with spreading bad sectors forces repeated reads on degraded media. If transfer speeds drop sharply or files return errors mid-copy, stop.
External hard drive is greyed out in Disk Utility
A greyed-out external hard drive in Disk Utility usually means macOS can detect the physical device but cannot mount its volume. This commonly points to an unmounted partition, a corrupted partition map, or file system damage such as a broken APFS container.
In many cases, the drive’s data is still present, but macOS cannot interpret the structure well enough to provide access.
Start by selecting the greyed-out volume, then click Mount in Disk Utility. If mounting fails or the volume returns First Aid errors, avoid formatting the drive until you have assessed recovery options, since reinitializing the disk can overwrite critical file system metadata.
If your external hard drive still does not appear on your Mac after troubleshooting, the issue may involve file system corruption, firmware failure, or physical damage that requires specialized equipment for repair. SalvageData provides professional data recovery services for failed external drives, including devices affected by logical corruption, mechanical failure, and severe media damage. Our engineers use advanced recovery techniques to safely retrieve data from drives that macOS can no longer detect.