
A Dell laptop that won't turn on is one of the most common hardware complaints across Inspiron, XPS, Latitude, and Alienware models. SalvageData's laptop data recovery team sees these cases regularly, and the right fix depends on identifying the failure type. Most cases resolve with a power drain or system reset. When the drive is involved, time matters.
Key Takeaways:
- The right fix depends on whether the laptop has No Power, No POST, No Boot, or No Video: each requires a different approach.
- A hard reset (flea power drain) and an RTC reset resolve most "won't turn on" cases without data loss.
- A clicking or grinding sound from the drive means you should power off the laptop immediately and send it to a professional.
What's actually happening when your Dell won't start
A Dell laptop that won't turn on can be in one of four distinct failure states. Identifying the correct state before applying any fix prevents wasted steps and potential additional damage to the drive.
Not every "won't turn on" situation describes the same problem. A laptop with no lights, no fan activity, and no response belongs in a different diagnostic path than one that powers on, reaches the Dell logo, and then freezes.
| Diagnostic State | What It Looks Like | What It Means | Where to Start |
| No Power | No lights, no fan, keyboard backlight off, power button unresponsive | Laptop not receiving or drawing electricity | Power source, hard reset, RTC reset |
| No POST | Lights or fans come on, screen stays black or freezes on Dell logo | Laptop receives power but fails early hardware check | ePSA Diagnostics (F12), RAM, BIOS |
| No Boot | Passes Dell logo, fails to load Windows ("No Bootable Device Found" or blue screen) | Hardware is functional; OS or storage drive is the issue | Check BIOS settings, boot order, and Safe Mode. See: boot device not found |
| No Video | Fans running, caps lock LED responds, screen stays dark | Power and board operational; display or GPU connection issue | External monitor via HDMI. See: PC turns on but no display |
What Dell LED blink patterns and beep codes mean
Dell laptops use power LED flash patterns and beep sequences during startup to communicate specific hardware failures before Windows loads. These signals identify the problem before you attempt any fix.
Recognizing these patterns narrows the diagnostic path immediately, rather than forcing you through steps without direction.
| LED or Beep Pattern | Likely Cause | Next Step |
| 2 amber / 3 white blinks | Memory (RAM) failure | Reseat or test RAM sticks individually |
| Persistent amber blinks | System board or component failure | Contact Dell Support or a repair center |
| Continuous beeps during startup | POST hardware failure | Run ePSA Diagnostics via F12 |
| No lights, no sound, no response | No power reaching the system | Hard reset, then RTC reset |
If the screen is completely dark, but the fans are running, and the Caps Lock LED responds to key presses, the display panel or GPU connection is the likely issue, not the storage drive or motherboard. Testing with an external monitor via HDMI can quickly confirm or rule this out.
How to fix a Dell laptop that won't turn on
Most Dell laptops that won't power on respond to one of the first three steps below. Work through them in order before moving to advanced steps.
1. Disconnect peripherals and test the power source
USB drives, docking stations, external hard drives, and monitors can draw excess current or create electrical shorts that trigger the motherboard's safety shutdown.
Unplug everything before proceeding to eliminate this variable. Then verify the power source before assuming the laptop is the problem.
Plug the AC adapter directly into a working wall outlet, bypassing any power strip.
Check the LED indicator on the AC adapter brick: if it stays off when plugged into the wall, the charger is dead and needs replacing before testing anything else.
2. Perform a hard reset (flea power drain)
Residual electricity stored in the motherboard capacitors can prevent the laptop from starting normally. A hard reset, also known as draining residual power or a flea power drain, clears static charges trapped in system capacitors that can prevent your laptop from turning on.
1. Turn off the laptop and unplug the AC power adapter.
2. Eject the battery if it is removable. If your laptop has an internal battery, open the base cover to carefully unplug the battery connector. Otherwise, residual power will remain in the motherboard.
3. Press and hold the Power button for 15 to 20 seconds.
4. Reconnect the AC adapter (without reinserting the battery, if applicable) and press the power button.
If the laptop powers on via AC alone at this point, the battery is shorted or degraded and needs replacement.
3. Run the RTC reset
The Real-Time Clock (RTC) reset restores factory BIOS defaults and clears the system state. It is available on all modern Dell lines: Inspiron, Latitude, XPS, Precision, Vostro, and Alienware.
1. Power the laptop down and connect the AC adapter.
2. Press and hold the Power button for 30 to 35 seconds.
3. The power LED will blink three times. Release the button and allow the system to restart automatically. It may cycle through several restarts during initialization.
Holding the button for under 25 seconds or over 40 seconds aborts the reset. If the system does not restart on its own, repeat, paying close attention to timing.
4. Run Dell ePSA preboot diagnostics
If the laptop powers on briefly or reaches the Dell logo, the ePSA Preboot System Assessment identifies which hardware component is causing the failure.
1. Turn on the laptop and immediately press F12 repeatedly.
2. Select Diagnostics from the One-Time Boot Menu.
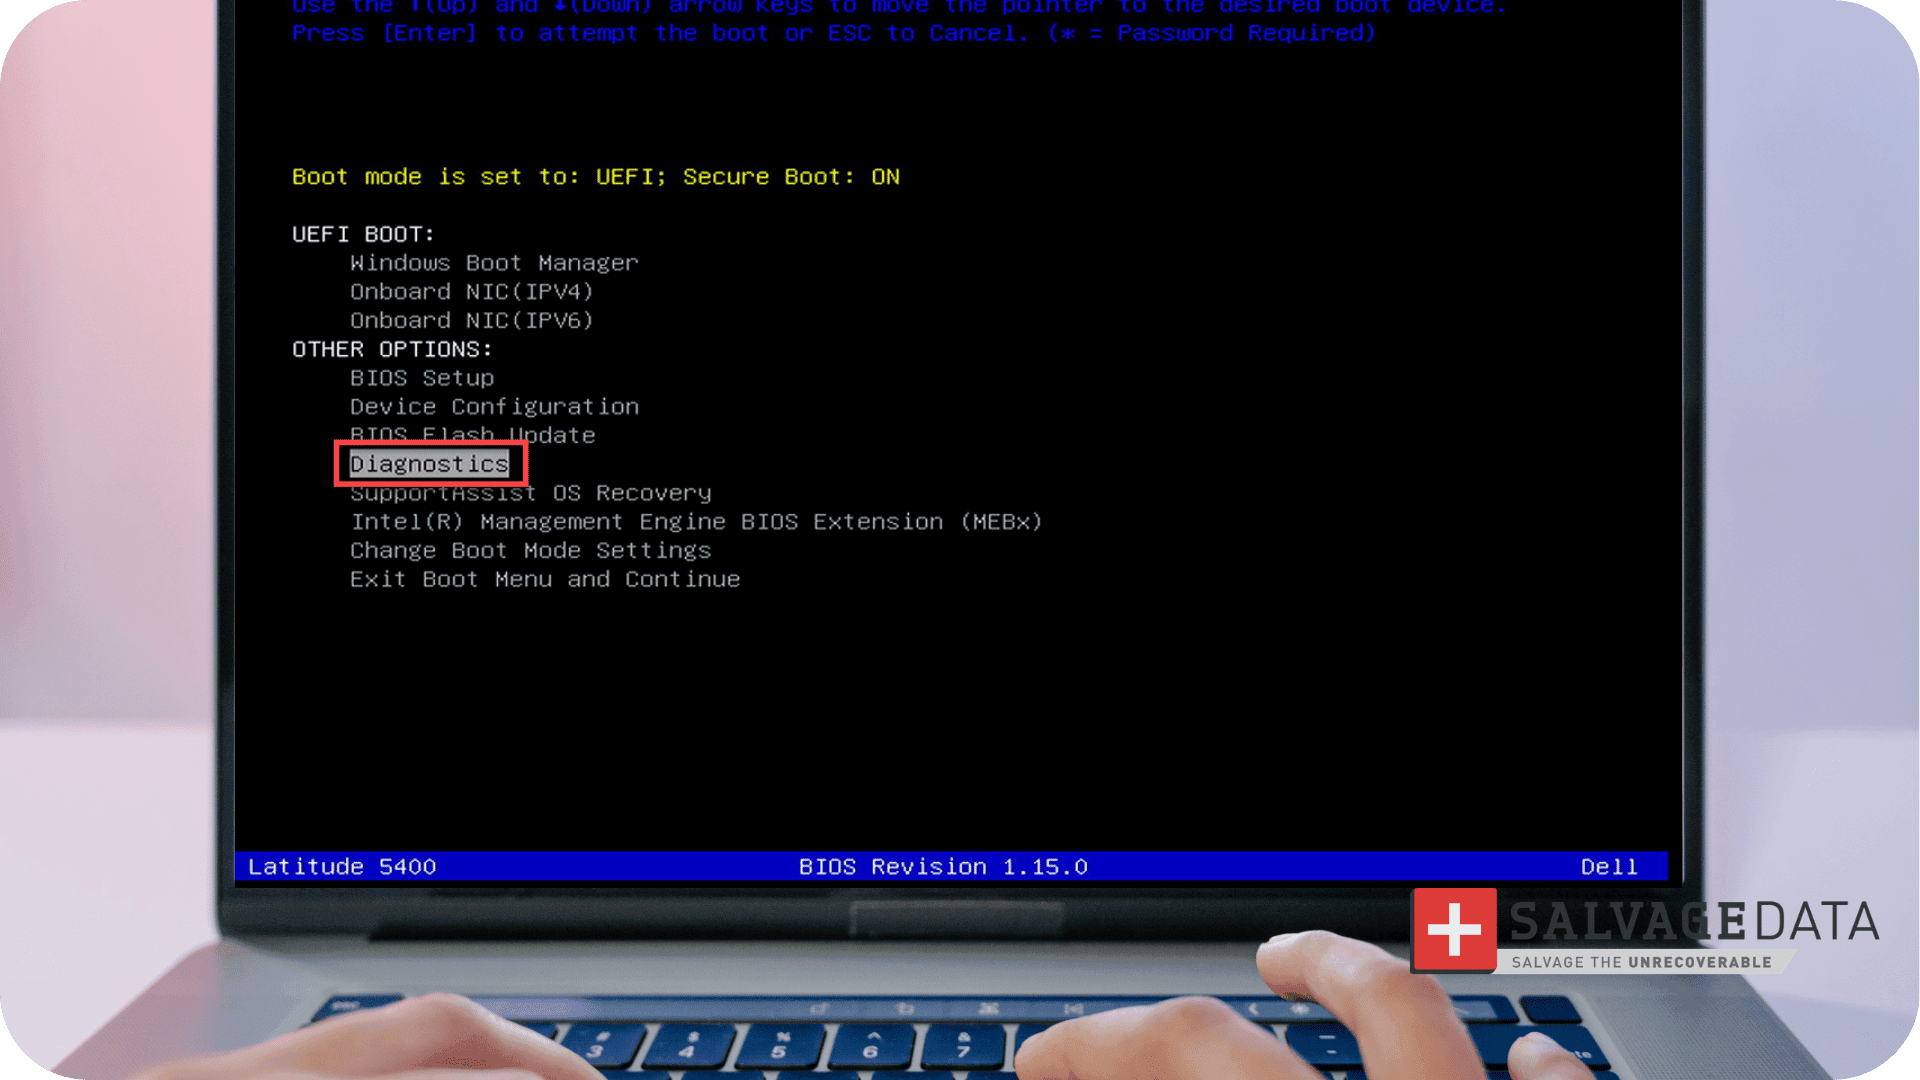
3. Allow the full scan to complete.
4. Record any Error Codes or Validation Codes the scan produces; these go directly to Dell Technical Support.
If the diagnostic scan returns failure codes, contact Dell Support with those codes before continuing.
5. Reset the CMOS battery (legacy models only)
If your model features a standalone coin-cell battery, disconnect both the main battery and coin-cell battery for one minute. Skip this step if you have a thin/modern ultrabook, as it lacks a coin-cell battery and instead uses the RTC reset detailed in Step 3.
1. Disconnect AC power and remove the main battery if possible.
2. Open the base enclosure and locate the small round coin-cell battery.
3. Remove it and wait one minute.
4. Reinsert the battery, reassemble, and try powering on.
Opening the laptop can void the warranty and cause further damage without proper tools and experience. An authorized technician should perform this step when possible.
6. Boot into Safe Mode
If the laptop powers on but stalls before reaching the Windows login screen, a driver conflict or recent software change may be the cause.
1. Hold the Shift key while selecting Restart, or interrupt the boot sequence three times to reach Advanced Options.
2. Select Startup Settings, then Safe Mode with Networking.
3. Run antivirus or antimalware software and remove any recently installed drivers or applications.
7. Factory reset (last resort)
A factory reset reverts the system to its original configuration, resolving driver conflicts and software failures that block normal boot.
Warning: Factory reset causes data loss. Do not proceed without a confirmed backup of all files.
To initiate a factory reset: repeatedly press F12 at startup to open the One-Time Boot Menu and select SupportAssist OS Recovery, or trigger the Windows Recovery Environment (WinRE) by interrupting the boot process three times.
If no backup exists and the drive is still accessible, back up files first using Safe Mode or an external recovery tool. If the drive is inaccessible, skip this step and proceed to the hard drive section below.
What to do when the hard drive is the problem
If the steps above don't resolve the issue, the storage drive may be the source of the failure. Distinguishing between a logical and a physical problem determines the correct next step and whether data is at risk.
According to Michael Galloway, HDD Recovery Engineer at SalvageData, checking whether the storage device appears in the BIOS is the critical first step in that diagnosis. A drive visible in the BIOS points to a logical issue such as operating system corruption or bad sectors. A drive that does not appear in the BIOS at all indicates a physical failure or a motherboard problem. Testing the drive in a second computer helps confirm which situation is present.
Audible symptoms require a more urgent response. Galloway notes that a clicking sound from the drive can indicate the read/write heads are failing or contacting the platters, which causes additional physical damage with every second the drive continues to run.
The correct response to a clicking or grinding noise is to power the laptop off immediately. Running recovery software at that point significantly increases the risk of permanent data loss.
For more context on what these symptoms look like before a drive reaches full failure, the guide on signs of hard drive failure covers the full progression. For the clicking noise specifically, hard drive clicking explains what is physically happening and why the recovery window narrows quickly.
A laptop hard drive that won't boot but hasn't been further damaged is recoverable in most cases, provided a professional evaluates it before you try anything else.
When to contact data recovery services
If the fix sequence doesn't work, the drive doesn't appear in BIOS, or the laptop shows signs of physical damage from a drop or liquid exposure, professional evaluation is the appropriate next step.
SalvageData technicians are available 24/7 and perform a free in-lab evaluation for Dell laptops. If the laptop hardware can't be repaired, Dell data recovery services can retrieve data from the drive and deliver it to a working device or external storage.