Key Takeaways:
- Swap USB ports or cables and listen for clicking sounds.
- Most "invisible" drives just need a new drive letter or initialization.
- Outdated "Disk Drive" drivers in Device Manager often cause connection drops.
- If the drive makes physical noise, stop immediately and seek professional help to avoid permanent data loss.
Connecting a hard drive only to find it missing from your computer is a high-stress moment. Whether it's an external drive full of photos or an internal hard drive with work files, the "invisible drive" issue is one of the most common Windows errors.
"The biggest mistake users make is repeatedly power-cycling a drive that isn't showing up," says Kyle Ciresi, Specialist in HDD recovery. "If there's a mechanical failure, every second the platters spin could be destroying data. Always check the software side first, but listen closely to the hardware."
Step 1: Preliminary Hardware Checks
Before diving into software settings, ensure the physical connection is secure.
- Try a different port: Move the drive to a port directly on the motherboard (for desktops) rather than to a front-panel USB port.
- Swap the cable: Faulty USB or SATA cables are a leading cause of drives not showing up.
- Test on another PC: If the drive works elsewhere, the issue lies with your Windows configuration.
"If your drive is making a rhythmic clicking or grinding sound, it's not a Windows issue, but a mechanical one. In these cases, software 'fixes' will only make it worse," Ciresi warns.
Step 2: Use Windows Disk Management
If the hardware is fine but the drive is missing from "This PC," it usually appears in Disk Management.
It can happen if the drive's file system is corrupted, if it's a new drive that hasn't been initialized, or if the drive letter has been removed or conflicted with another drive.
Drive is “Offline”
Follow this step if your drive is brand new or has no data on it, as the “offline” status can cause data overwrite, warns Ciresi.
- Look for it in the list of drives in Disk Management.
- If it is listed as "Offline," right-click on it and select "Initialize Disk." This should make the drive accessible.

Drive is 'Unallocated'
If the drive shows a black bar, it needs a new volume.
- Right-click the unallocated space.
- Select New Simple Volume and follow the prompts.
Warning: This will format the drive. If you need the data, use Windows recovery software to create a disk image or back up your files to a second drive.
Drive is missing a Drive Letter
If the drive shows a healthy partition but no letter (like E: or F:), Windows can't see it. However, Ciresi alerts that this should be avoided if the drive has data on it, as modification of the drive letter could cause a data overwrite situation
- Right-click the partition.
- Select Change Drive Letter and Paths.
- Click Add and assign a new letter.
Step 3: Troubleshoot via Device Manager
Outdated or corrupted drivers can prevent Windows from recognizing your external hard drive.
Drivers can become outdated when new versions are released to improve compatibility or fix bugs. They can become corrupted due to system crashes, incomplete updates, or conflicts with other software.
- Press Win + X and select Device Manager.
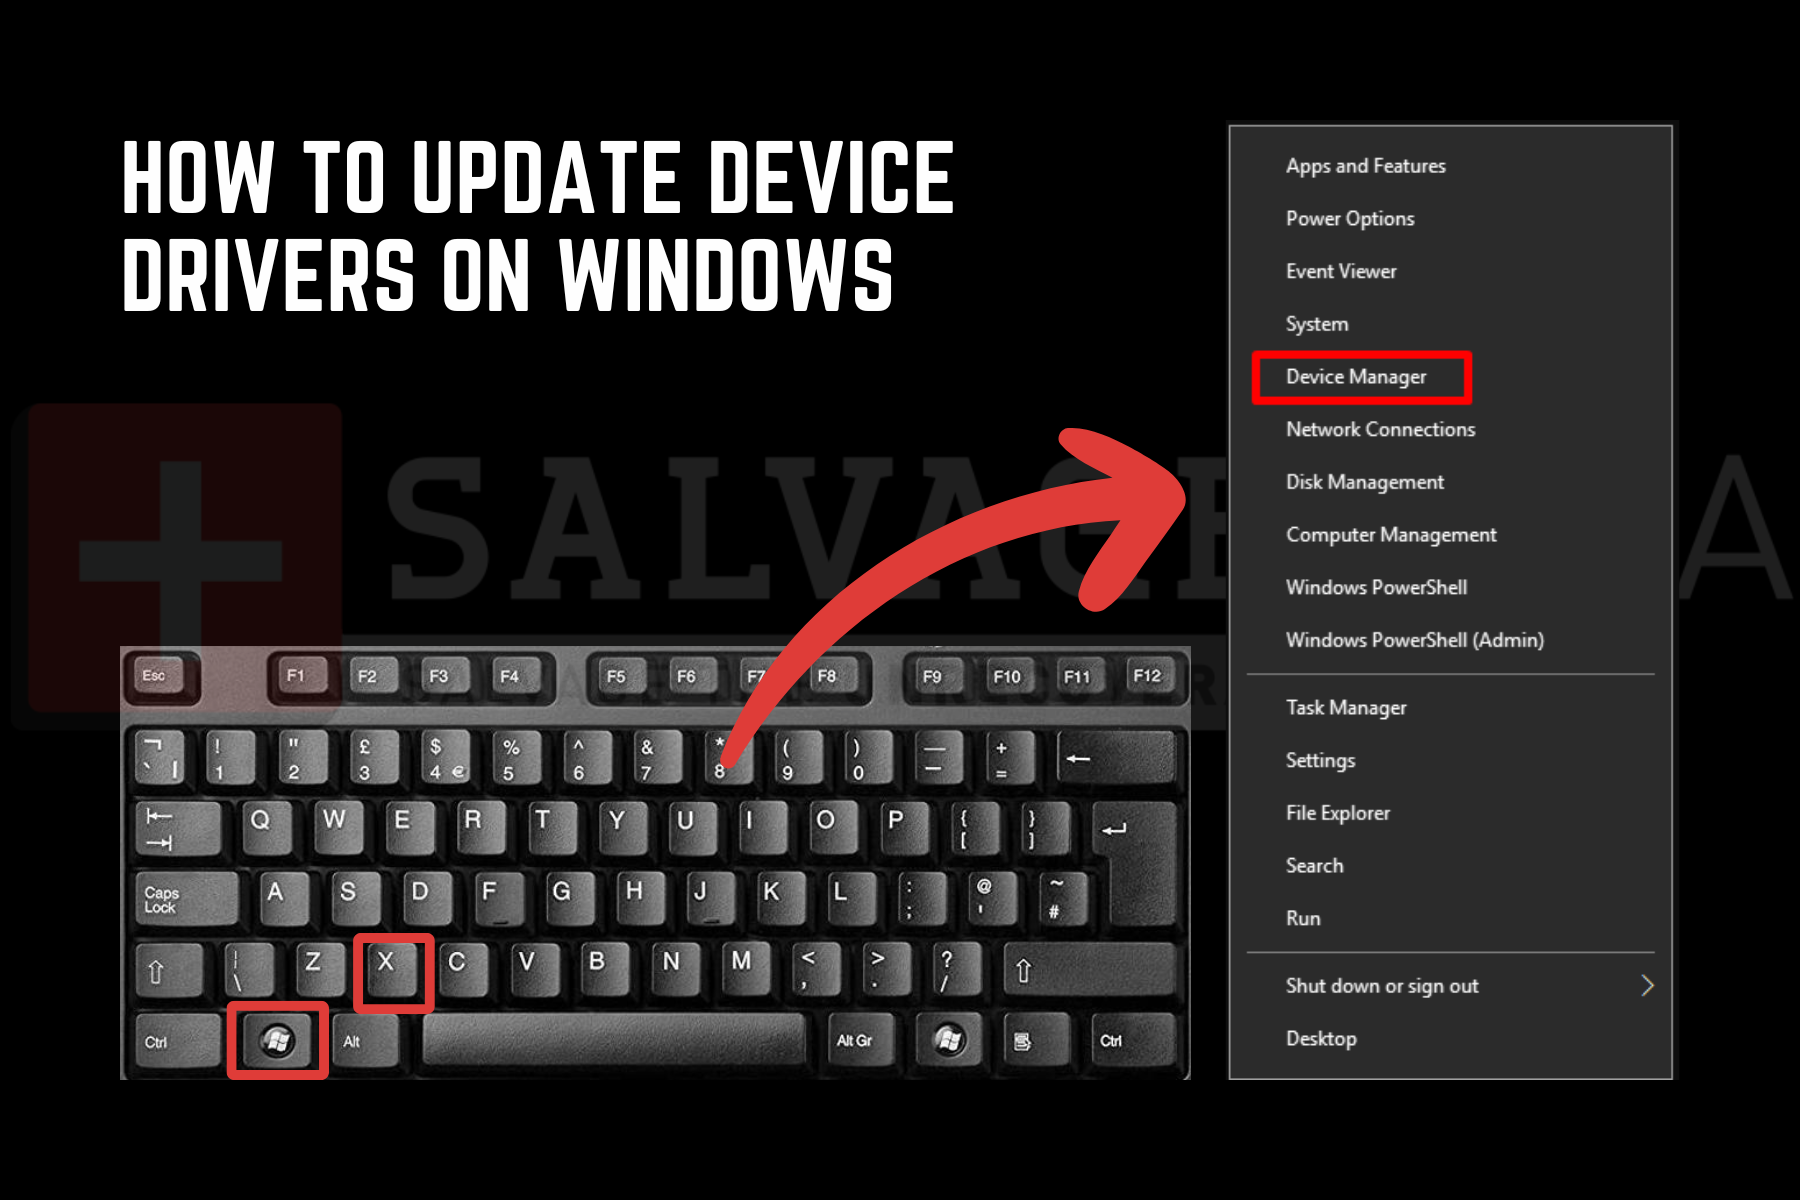
- Expand Disk drives.
- Right-click your missing drive and select Update driver.
- If that fails, select Uninstall device, unplug the drive, and plug it back in to force a driver reinstall.
"Uninstalling the device in Device Manager, and reinstalling the drivers is essentially like plugging the drive in for the first time,” explains Ciresi. “This is not modifying the drive software. This process is simply changing or updating how Windows communicates with the device."
Step 4: Use the CHKDSK command (advanced fix)
Your external hard drive might have file system errors preventing Windows from recognizing it properly. File system errors happen because of improper drive removal, power outages, or hardware issues.
CHKDSK (Check Disk) is a built-in Windows system utility that verifies a volume's file system integrity and fixes logical file system errors. It scans the "map" of your hard drive to ensure that every file is in its right place and that the drive's structure is sound.
However, while it can "fix" a drive so it shows up again, it does so by removing or relocating corrupted data.
"It repairs the drive's file system by essentially 'cleaning house.' If the drive has physical damage or bad sectors, the stress of a CHKDSK scan can cause a total mechanical collapse. If your files are not backed up, don’t try this step," warns Ciresi.
CHKDSK is a "stress test." If your drive is clicking or the data is unique, skip this and call a professional.
- Open Command Prompt as an administrator.
- Type chkdsk X: /f /r (replace X with your drive letter) and press Enter.
- The /f switch: Tells Windows to fix errors on the disk.
- The /r switch: Tells Windows to locate bad sectors and recover any readable information.
Note: This process can take several hours depending on the size of your hard drive. Do not unplug the drive or restart your computer until the process is 100% complete, as interrupting a scan can lead to further file system corruption.
When to call a specialist
This problem isn't limited to Windows. Mac users may also face situations where their Mac isn't recognizing the external hard drive, and specific brands can present unique challenges, too, such as Seagate external hard drives not working or Samsung SSDs not showing up.
When Disk Management shows the drive as 'Unknown, Not Initialized' or 'No Media,' you are likely looking at a failed controller or head assembly. If your data is irreplaceable and the steps above fail, do not attempt to "DIY" a physical repair. You can request help from our certified cleanroom to ensure your hard drive recovery is handled safely.