Key Takeaways:
- A USB drive not showing up on Mac is usually caused by one of four things: Finder is not set to display external drives, the drive is formatted in NTFS (Windows-only), a USB-C adapter is failing, or a macOS privacy prompt was dismissed.
- A dismissed "Allow accessory to connect" prompt on macOS Sequoia or Sonoma will block the drive completely until the permission is reset in System Settings.
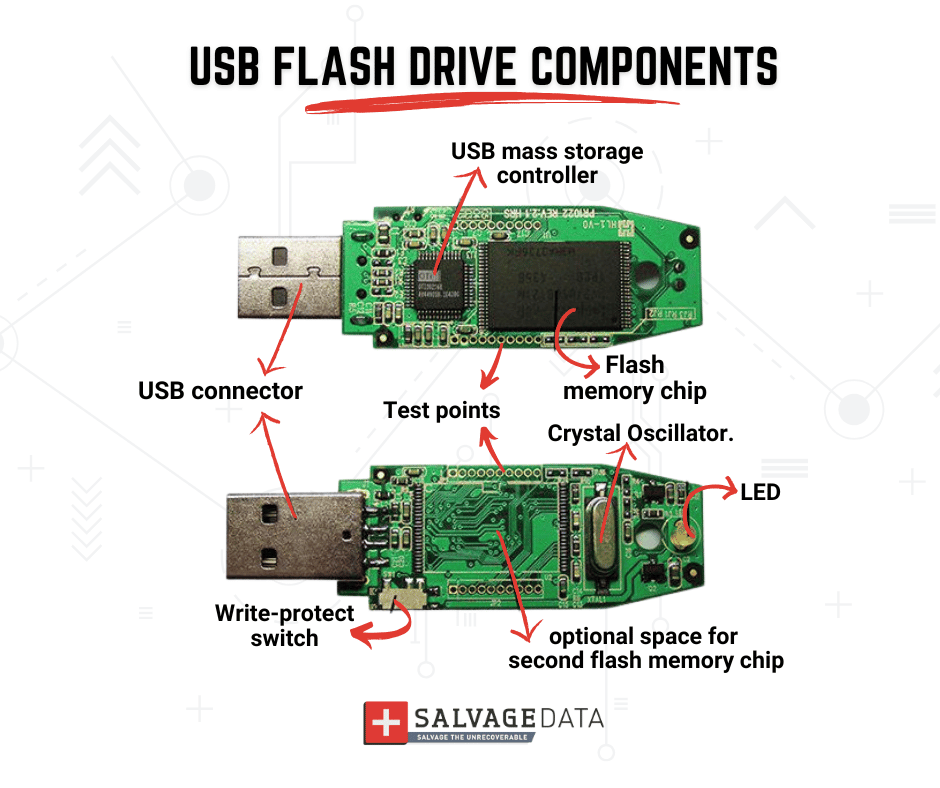
- Listen for any sounds from the drive when plugged in. Flash drives have no moving parts and should be completely silent. Any audible noise, including buzzing or whistling from the board, is coil whine and signals a power delivery problem. Stop immediately and do not proceed with any software fix.
You plug in a USB drive, and nothing happens. No icon on the desktop, no prompt, no sound. If your USB drive isn't showing up on your Mac, it’s natural to assume it's dead. Luckily, most of the time, it isn't.
Mac and USB detection failures are almost always either a settings issue, a file system mismatch, or a bad cable or adapter. Flash drive data recovery specialists at SalvageData see hundreds of USB cases per year, and the majority of drives that come in as "undetected" usually have damage that occurred during troubleshooting, not as the original failure.
Why your Mac isn't recognizing a USB drive
A USB drive can fail to appear on a Mac for several distinct reasons, and the fix depends entirely on which category the problem falls into. Understanding the difference before clicking anything is the most important step.
The two main categories are logical failures and physical failures, and each cause has a different approach. Be careful when diagnosing, as some logical fixes can make a physical problem worse.
- Logical causes (software or settings): Finder is not configured to show external drives, the drive is mounted but hidden, the file system is incompatible with macOS, macOS permissions are blocking access, or a system setting needs resetting.
- Physical causes (hardware): The USB port has failed, the drive's connector is damaged, the adapter or dongle is faulty, or there is internal damage to the flash memory or controller chip.
The "Allow accessory to connect" pop-up (macOS Sequoia and Sonoma)
On macOS Sequoia (15) and macOS Sonoma (14), Apple added a privacy gate for connected accessories. When a new drive is plugged in, a system prompt appears: "Allow accessory to connect?"
If that prompt was dismissed or clicked "Don't Allow," the drive will not mount regardless of any other troubleshooting step.
To reset it:
- Go to System Settings, open Privacy & Security
- Scroll to Security, and look for "Allow accessories to connect"
- Change the setting to "Ask every time" or "Always," then reconnect the drive
The dongle and hub problem
Most USB flash drives have a USB-A connector, the wide, rectangular plug. But MacBooks made after 2016 have only USB-C ports, which are smaller and oval-shaped. To bridge the gap, users rely on a USB-C adapter (commonly called a dongle) or a USB hub.
The problem is that the adapter sits between the Mac and the drive. If the adapter is faulty, underpowered, or simply cheap, the Mac never receives a clean signal from the drive. This is one of the most common reasons a USB drive does not show up on a Mac, and it is almost never the first thing users think to check.
Before running any software fix, test with a different adapter, or plug the drive directly into a different Mac or Windows computer. If it shows up immediately on another device, the drive is fine, and the original adapter might be the problem.
Quick physical checks before troubleshooting
Start here. Half of all USB detection failures on Mac come down to a bad port, a faulty adapter, or a loose connection. These checks take two minutes and will tell you whether you even need the software fixes below, or even if you need professional help.
- Try a different USB port or a different USB-C adapter entirely.
- Try the drive on a second computer, Windows or Mac. If it shows up there, the problem is with the first Mac's settings or port.
- Check the drive for physical damage, such as bent pins on USB-A connectors, a cracked housing, or debris in the port.
- Restart the Mac. A simple restart clears the cached mount tables and resolves many detection failures on its own.
How to show USB drives in Finder (step-by-step)
The most common reason a USB drive does not appear on the Mac desktop is that Finder is not set to display external drives. This is a default setting issue, not a drive problem.

Adjusting Finder preferences for external drives
On macOS Ventura (13) and later:
- Open Finder and select Finder in the menu bar.
- Click Settings (previously called Preferences).
- On the General tab, check the box next to External disks. This makes connected drives appear on the desktop.
- Click the Sidebar tab and check External disks under Locations. This makes them visible in the Finder sidebar.
On macOS Monterey (12) and earlier, the menu item is called Preferences instead of Settings. The checkboxes are in the same location.
After enabling both settings, unplug and reconnect the drive. If it was already connected and recognized by macOS, it will now appear immediately.
Disk Utility and Terminal fixes
If the drive does not appear in Finder after adjusting preferences, the next step is to check whether macOS can detect it at all using Disk Utility. This check reveals whether the problem is a mounting failure or a deeper hardware issue.
- Go to Applications > Utilities > Disk Utility
- Click View in the top left and select Show All Devices
- Look for the USB drive in the left panel
How to mount a drive manually in Terminal
If the drive appears in Disk Utility but will not mount via the Mount button, Terminal can force the mount:
- Go to Applications > Utilities > Terminal
- Type diskutil list and press Return
- Locate the USB drive by its size. Note the disk identifier, such as disk2 or disk3s1
- Type diskutil mountDisk /dev/disk2 (replace disk2 with your identifier) and press Return
- If the drive mounts, it will appear in Finder immediately
Should you run First Aid if the USB drive is not showing up on your Mac?
First Aid in Disk Utility repairs logical file system errors. It is safe for drives that are functioning normally but have a corrupted directory or minor file system inconsistency.
However, do not run First Aid on a drive that shows any sign of physical failure.
First Aid forces a full-volume scan, which stresses the storage components. On a flash drive with controller chip damage or degraded NAND cells, this scan can trigger a complete failure, making recovery significantly harder.
A corrupted USB drive with no physical symptoms is a reasonable candidate for First Aid. However, a flash drive that is completely invisible to System Information is not.
File system issues: NTFS, ExFAT, and Mac compatibility
Many USB drives sold globally are formatted in NTFS, the native Windows file system. macOS can read NTFS drives but cannot write to them by default. More importantly, some NTFS drives will not mount in Finder at all without a third-party driver.
How to identify your drive's file system
Open Disk Utility and select the drive. The format is listed directly below the drive name. Common formats and their Mac compatibility:
ExFAT and FAT32 are the recommended formats for a USB drive used across both Mac and Windows.
Reformatting for Mac and Windows compatibility
If the drive is formatted in an incompatible file system and the data on it is not needed, reformatting is the fastest fix.
WARNING: Formatting permanently erases all data on the drive. Back up any files before proceeding.
For a complete walkthrough, the format external hard drive guide covers every format option step by step.
To reformat in Disk Utility:
- Select the drive and click Erase
- Choose ExFAT as the format (for cross-platform use). If you’re only using the device on macOS, you choose the Mac OS Extended file system.
- Click Erase to confirm

Reset steps for Apple Silicon vs. Intel Macs
This is where most troubleshooting guides get it wrong. NVRAM and SMC resets are standard steps in older Mac guides, but they apply differently depending on the Mac's processor. Running the wrong reset has no effect and wastes time.
M1, M2, M3, and M4
On Apple Silicon Macs, there is no NVRAM reset key combination at startup. The firmware resets automatically when needed. The equivalent manual process is:
- Shut down the Mac completely (Apple menu > Shut Down).
- Wait 30 seconds.
- Press the power button to restart.
For persistent issues, Apple recommends a second method specific to Apple Silicon:
- Shut down
- Hold the power button for 10 seconds until "Loading startup options" appears
- Release, then start up normally
This forces a low-level system check without erasing any user data.
Intel Mac NVRAM and SMC reset
On Intel Macs, NVRAM stores peripheral settings, including USB configuration. Resetting it can resolve detection issues caused by corrupted port settings.
NVRAM reset:
1. Shut down the Mac
2. Press the power button and immediately hold Command + Option + P + R
%2C%20Command%20(%E2%8C%98)%2C%20P%2C%20and%20R.png)
3. Hold for 20 seconds, or until you hear the startup sound twice
4. Release and allow the Mac to finish booting
SMC reset (MacBook with non-removable battery):
- Shut down the Mac
- Hold Shift + Control + Option on the left side of the keyboard and press the power button simultaneously
%2C%20Control%20(%E2%8C%83)%2C%20and%20Option%20(%E2%8C%A5).png)
- Hold for 10 seconds, then release all keys
- Press the power button to start up normally
After the reset, reconnect the USB drive and check Disk Utility.
When should you call a data recovery specialist
Not every USB detection failure is a software problem. Some drives fail physically, and continuing to troubleshoot them with software tools reduces the chance of successful recovery.
Stop troubleshooting and contact a specialist if:
- The drive is completely invisible to Disk Utility, Terminal, and System Information, even after trying multiple ports and adapters.
- The drive was dropped, exposed to water, or physically damaged.
- The drive was showing errors or slow transfer speeds before it stopped mounting.
- Every attempted fix has made the drive behave differently, suggesting instability.
According to Alex Poliakov, an Apple Device Recovery Engineer at SalvageData, flash drives and SSDs produce no sound under normal operation because they have no moving parts. Any audible noise, such as buzzing or whistling from the drive's board, is coil whine from the inductors, which points to a power delivery problem and a hardware failure. Poliakov also notes that software-related detection failures are actually uncommon: when the hardware is functioning correctly, macOS typically recognizes the drive without issue. His recommended diagnostic sequence is to rule out the computer first by testing the drive in multiple other devices, then isolate the port by testing a known-good drive in the same Mac, and only then move to Disk Utility to determine whether the Mac sees the drive as a physical device at all.
If the data on the drive is critical and standard fixes have not worked, physically broken flash drive recovery explains what professional-level recovery looks like, including chip-off and NAND extraction methods.
SalvageData's Mac and MacBook data recovery service handles USB drives with physical failure, including cases where the drive is no longer detected by any Mac or Windows device.