
Even though modern iPhones can resist water for a while, older models are more delicate, and you may end up with a water-damaged iPhone. Fortunately, there are ways to fix a water-damaged iPhone and recover any lost data, including photos, messages, and videos. Whether you have a backup or not, this guide covers the immediate steps to save your data.
Immediate first steps to prevent water damage
Time is critical. Water corrosion begins immediately, and the wrong move (like plugging it in) can short-circuit the logic board, making data recovery significantly harder. The goal here is to prevent the water from reaching the logic board.
Dry the exterior
.png)
Use a clean, dry, and soft towel or another absorbent cloth to wipe down the phone. Try to remove as much water as you can, and get all the excess moisture off. You can use a cotton swab to try to dry smaller parts of the iPhone, such as the charging port, volume keys, and headphone jack.
Use the "Water Eject" shortcut (for newer iPhones)
If your iPhone is still powered on and functional, you can use the "Water Eject" Siri shortcut. This feature uses low-frequency sound waves to vibrate the speakers and charging port, physically pushing water droplets out of the device.
1. Open the Shortcuts app
2. Tap the Water Eject shortcut.
3. Select Begin in the menu

4. It will start emitting sound and waves. Wait until it finishes.
Important: Do not rely on this if the phone has already shut down on its own.
Power off
Shut down your iPhone immediately. This will minimize the water damage and help prevent further corrosion or data loss. Your phone has electrical circuits, and the sooner you power it down, the greater your chances of salvaging both the iPhone and its data.
If you can’t turn off your iPhone, you can try to force it to turn off. Don’t turn it back on until you finish all the steps, and don’t plug it into a power source or another device, such as a computer.
Wait 48 hours
Leave the iPhone in a dry, well-ventilated room for at least 48 hours so that any remaining water can evaporate completely away from the device.
Remove any part you can, such as the battery and SIM card slot.
What NOT to do if your iPhone gets wet
Myths about drying phones are dangerous. While some tricks might "fix" the phone enough to turn it on, they often destroy the data storage chips in the process.
Don’t use rice

Do not put your iPhone in rice. Rice is hydrophilic, but it also creates fine dust and starch. When this dust enters your wet charging port or headphone jack, it turns into a paste that can ruin connectors and accelerate corrosion on the motherboard.
Instead of rice, you can use silica gel. Cover the iPhone with silica gel packets if you have them; they absorb moisture without introducing dust.
Don’t use a hair dryer
Heat can damage other internal components, and airflow can push water deeper into the phone.
Water-damaged iPhone data recovery
If, after completing the steps to try to salvage the water-damaged iPhone, you still notice signs of damage or you can’t access your files or photos, then you should look for an Apple-verified iPhone data recovery service near you.
SalvageData technicians are experienced in recovering device data that seemed forever lost, like the iPhone 13 smashed during a concert or the water-damaged phone.
Recover data from a water-damaged iPhone with no backup
If your iPhone is dead due to water damage, software cannot help you. You cannot run a recovery program on a phone that doesn't boot. In this case, the damage is physical, likely a short circuit on the Logic Board.
In this case, the iPhone data recovery service is the only option you have to try to salvage your data.
Since a water-damaged iPhone data recovery process demands extra care, every step is taken to avoid further damage. That’s why an ISO class 5 cleanroom, where the air is controlled to prevent contamination, is critical to success.
Recover data from a water-damaged iPhone with backup
If you already have a backup, you don't need to risk repairing the water-damaged device. You can simply move your data to a new or replacement iPhone.
- Via iCloud: Start your new iPhone and select Restore from iCloud Backup during the "Apps & Data" setup phase.
- Via iTunes/Finder: Connect a functional iPhone to your computer, select your device, and click Restore Backup.
Pro tip: For a detailed, step-by-step walkthrough on these methods, you can check our comprehensive guide on restoring iPhones from backups.
Is my iPhone waterproof?
Most modern iPhones have an IP (Ingress Protection) rating, but this protection degrades over time and varies by model. Understanding IP Ratings:
- IP68: The phone is protected against immersion deeper than 1 meter (usually up to 6 meters for 30 minutes on newer models).
- IP67: The phone is protected against immersion between 15cm and 1 meter for up to 30 minutes.
- No Rating: Older iPhones (6s and earlier) have no official protection and are highly vulnerable to instant damage.
How to locate LCI on your iPhone
Use the table below to check your model's resistance and where to look for the Liquid Contact Indicator (LCI).
| iPhone Model | IP Rating | Max Depth | LCI Location |
|---|---|---|---|
| iPhone 17, 17 Pro, 17 Pro Max, 17e, Air | IP68 | 6 m (30 min) | US models: internal only (no SIM tray). Other regions: SIM tray slot, left side |
| iPhone 16, 16 Plus, 16 Pro, 16 Pro Max, 16e | IP68 | 6 m (30 min) | US models: internal only (no SIM tray). Other regions: SIM tray slot, left side |
| iPhone 15, 15 Plus, 15 Pro, 15 Pro Max | IP68 | 6 m (30 min) | US models: internal only (no SIM tray). Other regions: SIM tray slot, left side |
| iPhone 14, 14 Plus, 14 Pro, 14 Pro Max | IP68 | 6 m (30 min) | US models: internal only (no SIM tray). Other regions: SIM tray slot, left side |
| iPhone 13, 13 mini, 13 Pro, 13 Pro Max | IP68 | 6 m (30 min) | SIM tray slot, left side |
| iPhone 12, 12 mini, 12 Pro, 12 Pro Max | IP68 | 6 m (30 min) | SIM tray slot, left side |
| iPhone SE (2nd & 3rd gen) | IP67 | 1 m (30 min) | SIM tray slot, right side |
| iPhone 11 Pro, 11 Pro Max | IP68 | 4 m (30 min) | SIM tray slot, right side |
| iPhone 11, XS, XS Max | IP68 | 2 m (30 min) | SIM tray slot, right side |
| iPhone XR, X, 8, 8 Plus, 7, 7 Plus | IP67 | 1 m (30 min) | SIM tray slot, right side |
| iPhone 6s, 6, SE (1st gen) and earlier | Not rated | Not rated | Internal only (requires teardown) |
Note: IP ratings are based on lab tests with clean, still, fresh water at room temperature. Apple does not cover liquid damage under warranty, and water resistance decreases with normal wear. US iPhone 14 models and later ship as eSIM-only with no SIM tray, so the externally visible LCI is not present — the internal LCI requires teardown to inspect.
The LCI (Liquid Contact Indicator) on iPhones is usually a light on the side of your device that turns red when the iPhone has water damage. Earlier models have them on the left side of the iPhone, and more modern models have the LCI on the right side. To see the LCI, open the SIM card slot on your iPhone. You can open it by pushing the SIM card ejector tool (or a paperclip) into the pinhole on the side of your iPhone.
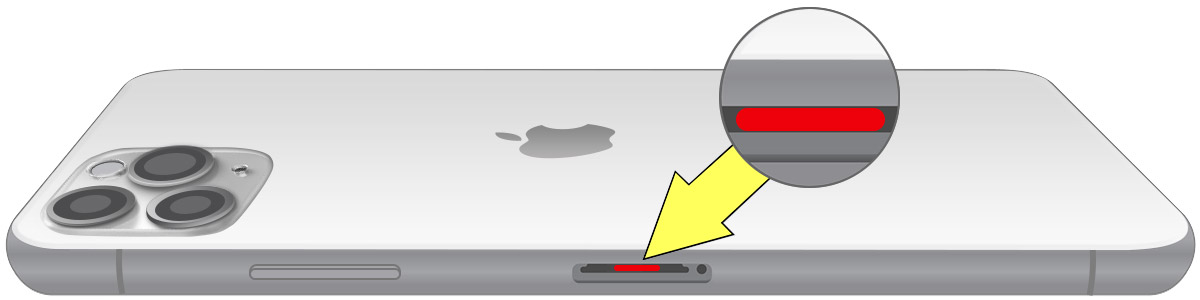
Locate LCI on iPhone 17, iPhone 16, iPhone 16 Pro, iPhone 16 Pro Max, iPhone 16 Plus, iPhone 15, iPhone 15 Plus, iPhone 15 Pro, iPhone 15 Pro Max, iPhone 14, iPhone 14 Plus, iPhone 14 Pro, iPhone 14 Pro Max, iPhone 13, iPhone 13 Pro, iPhone 13 Pro Max, iPhone 13 mini, iPhone 12, iPhone 12 mini, iPhone 12 Pro:
On these iPhone models, the LCI is located on the same side as the volume buttons, differing in the distance, being in the center or at the bottom.

Source: Apple support

Source: Apple support
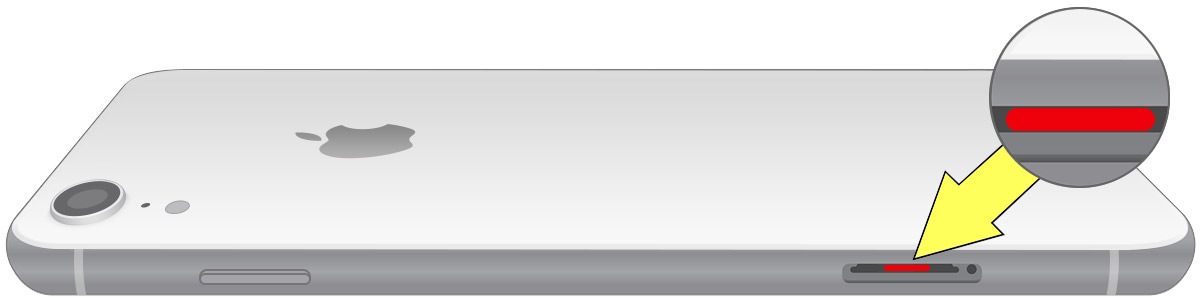
Locate LCI on iPhone 11, iPhone 11 Pro, iPhone 11 Pro Max, iPhone XR, iPhone XS, iPhone XS Max, iPhone X, iPhone 8, iPhone 8 Plus, iPhone SE (2nd and 3rd generation), iPhone 7, and iPhone 7 Plus
On these iPhone models, the LCI is located on the same side as the ON/OFF button in the middle or at the bottom.
Source: Apple support
Source: Apple support
Important: Water damage is not covered by the one-year warranty. If your iPhone presents the above symptoms and/or has the red LCI light, you must contact AppleCare or an iPhone repair service provider for help.